Lets Cook Navigation
Concepts
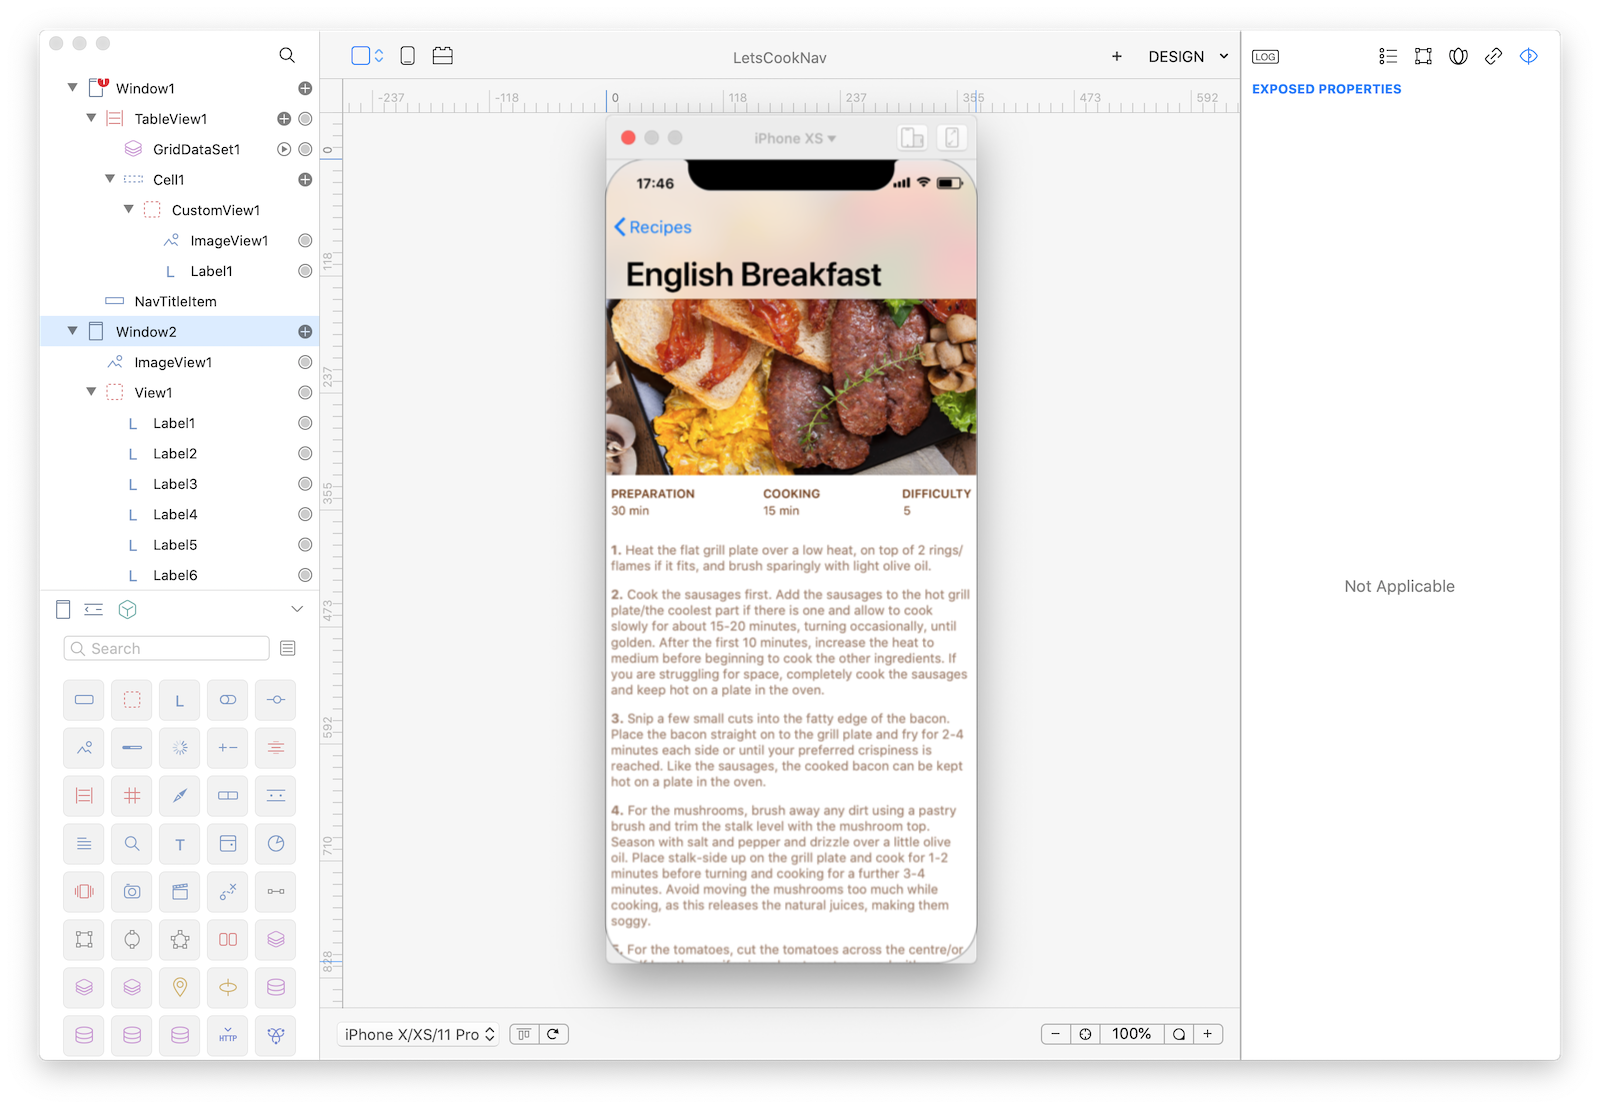
The LetsCookNav tutorial will show you how to navigate between two windows (using a Navigation Bar). A first window will show a list of options inside a TableView and a second window will show the details of the item selected in the TableView.
This example makes extensive use of CustomViews and DataSet bindings. Some advanced concepts are also illustrated like computed properties to show a graphical representation of a recipe's difficulty level and a runtime query performed when recipe's details need to be displayed.
Classes
Assets
- Recipes SQLite database - images credits to Lorenzo Bocchi
- PNG Launch Image - credits to Lorenzo Bocchi
- PNG Icon - credits to Jenya Tkach
Steps
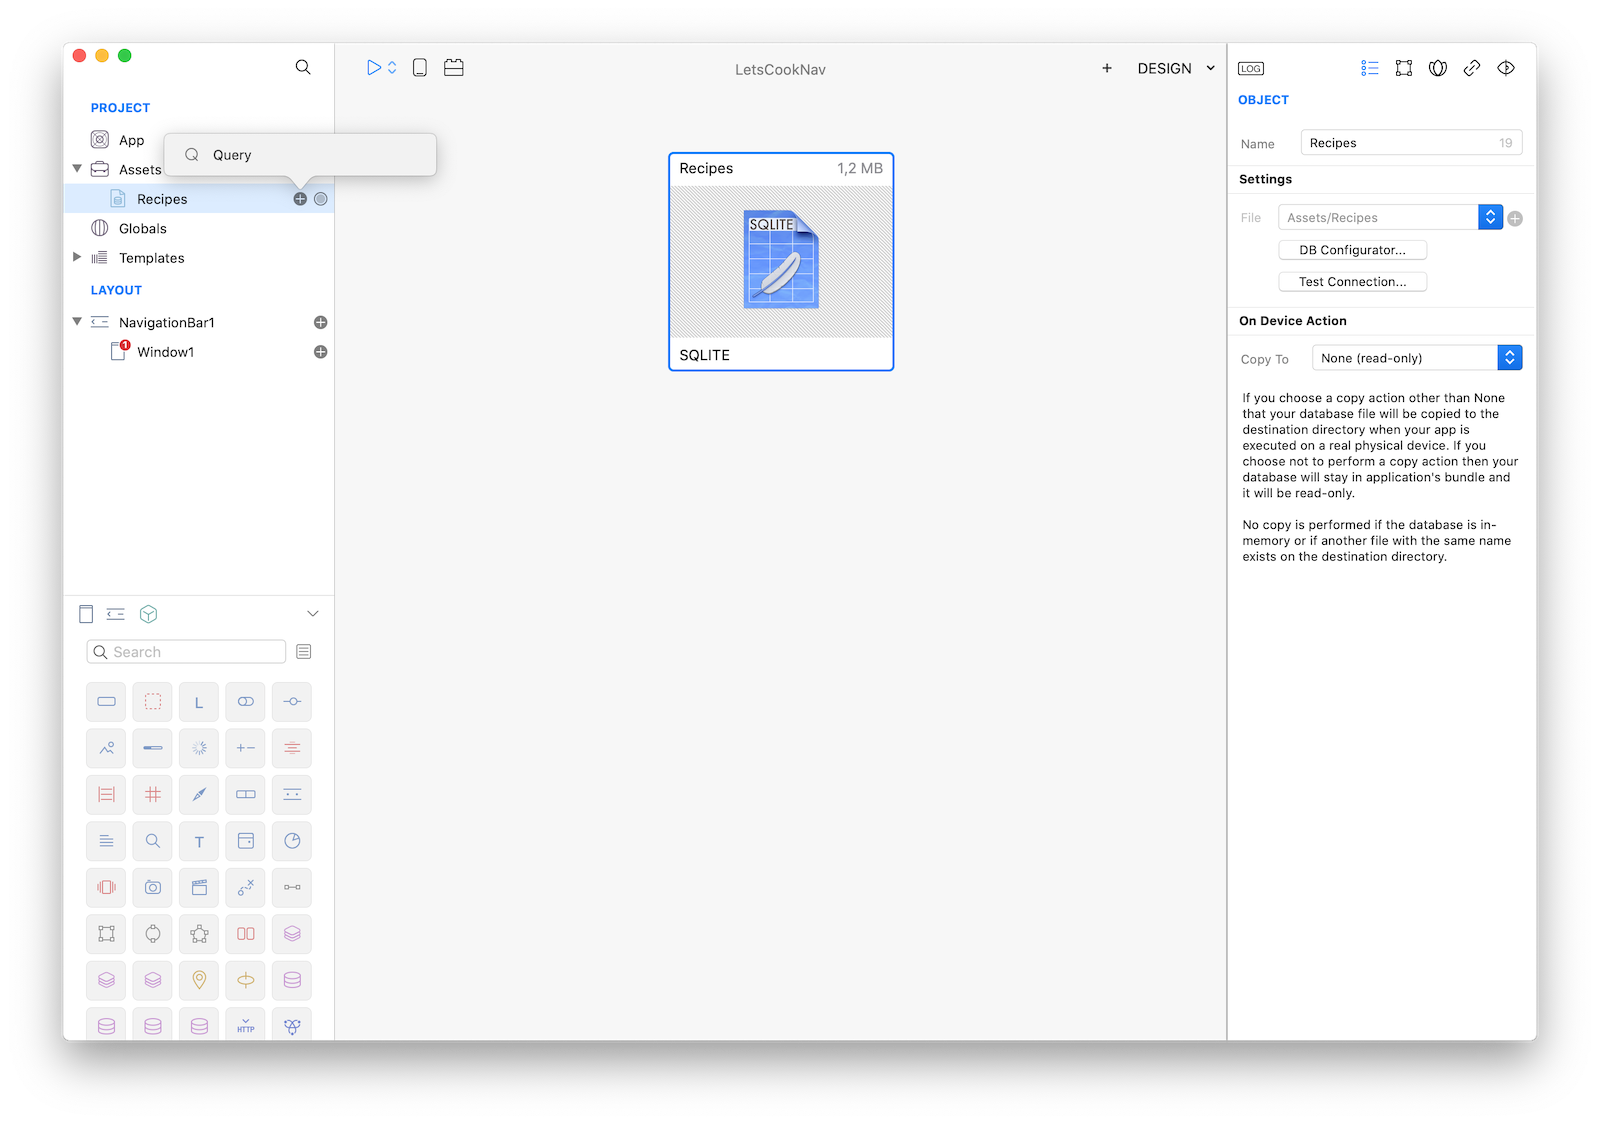
1 Create a new empty Creo project and start by dragging the Recipes.sqlite database into the Assets folder (then press Yes to the object conversion question).
2 Create a new database query object by using the contextual menu over the Recipes sqlite database:
3 In the Query Editor just drag the Recipe table into the SQL edit field and the sql query will be automatically created for you (you can also manually enter it). You can optionally press the Run button to test the result of your query (data in the instructions column is in Markdown format):

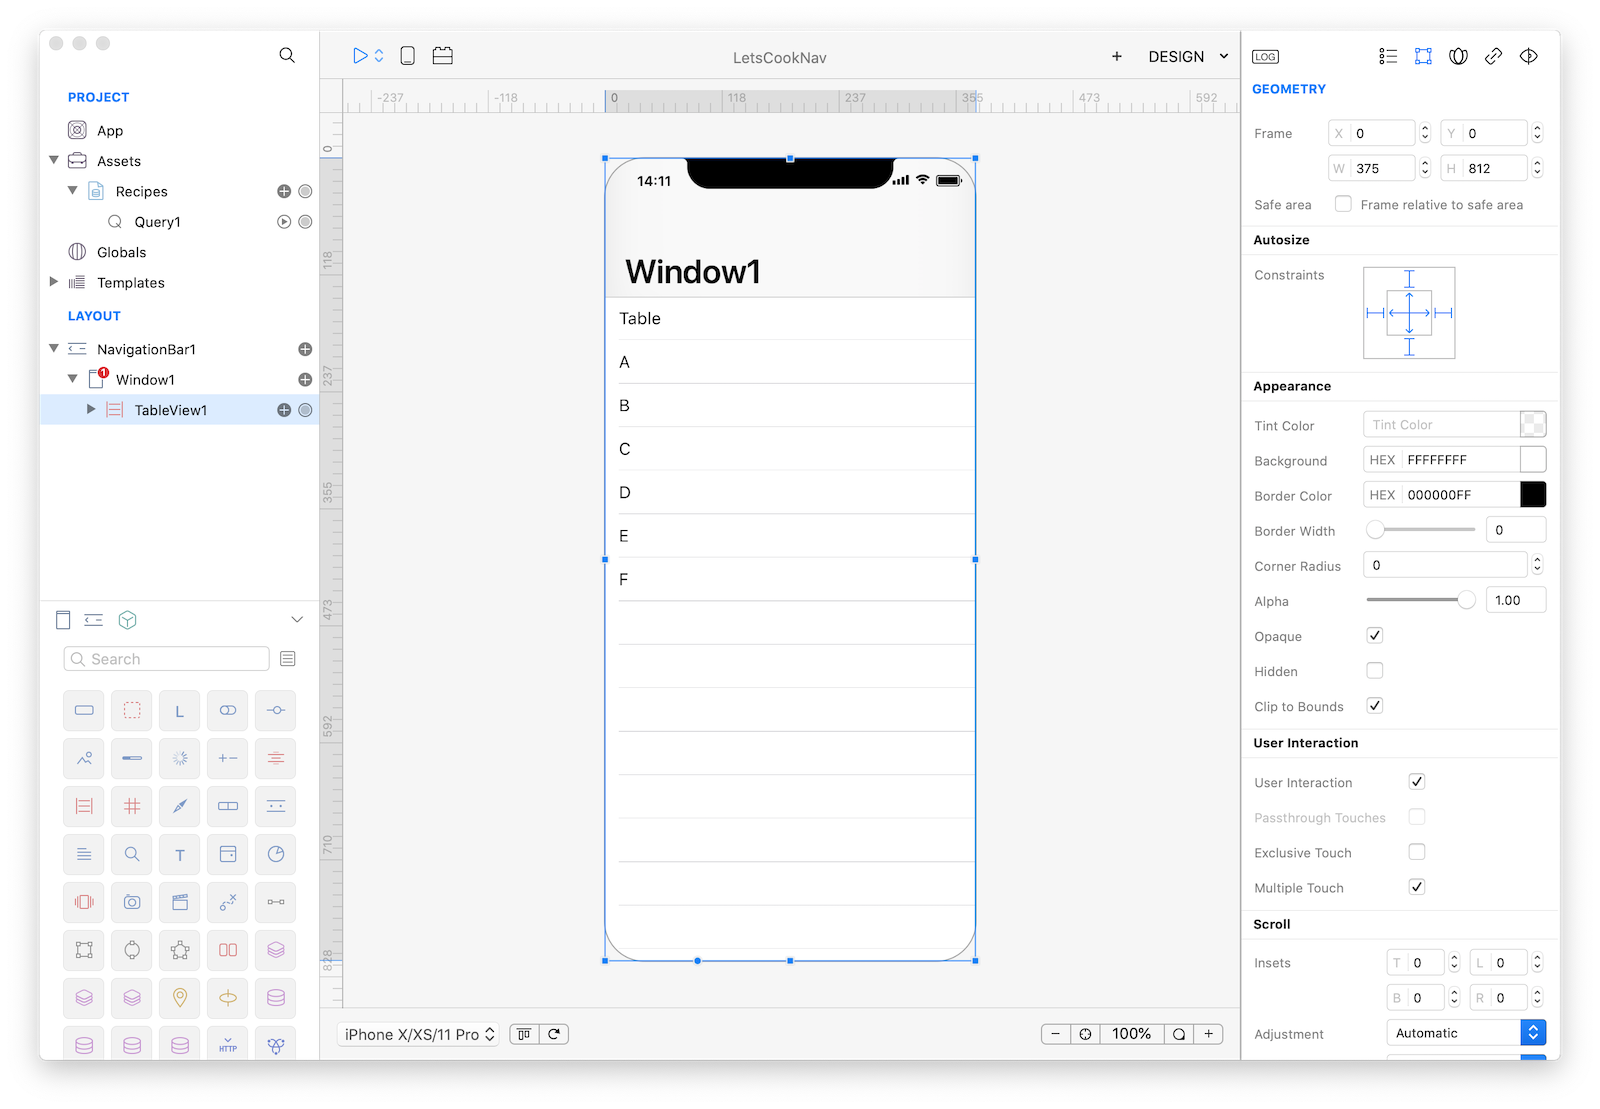
4 Drag a TableView control from the Objects panel into the Window1 and resize it to be as big as the Window:
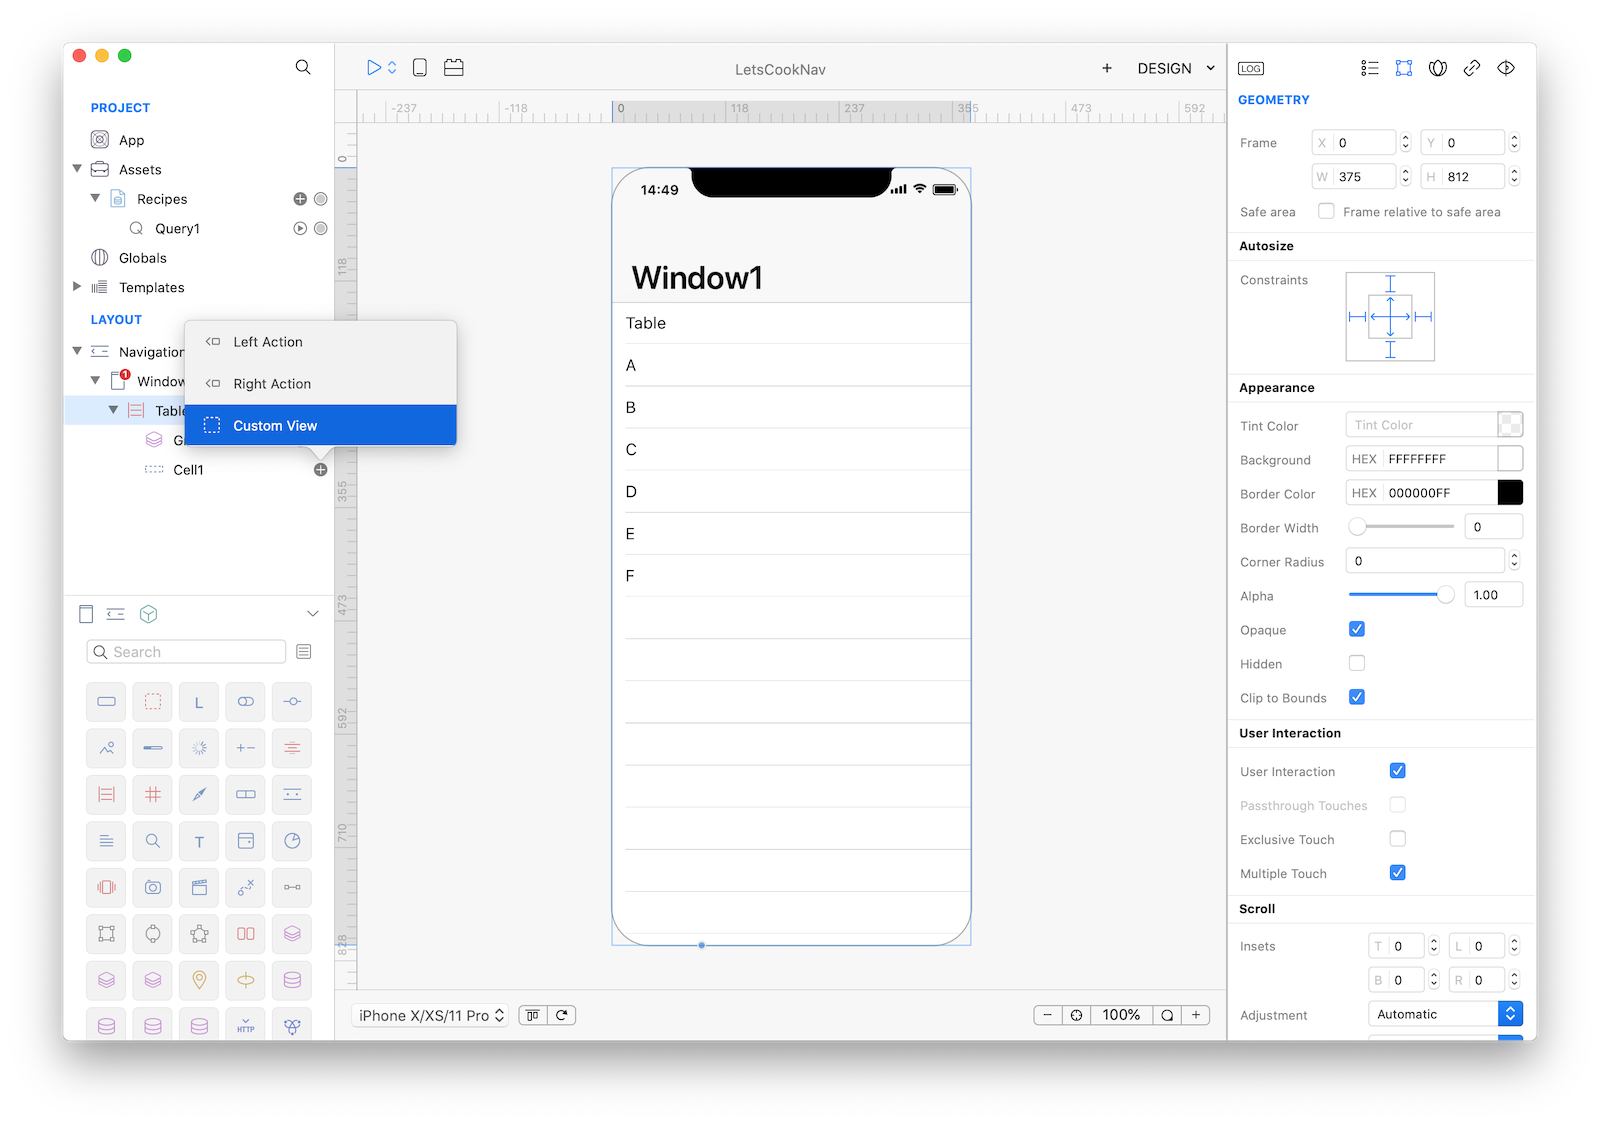
5 Create a CustomView in the TableView's Cell:
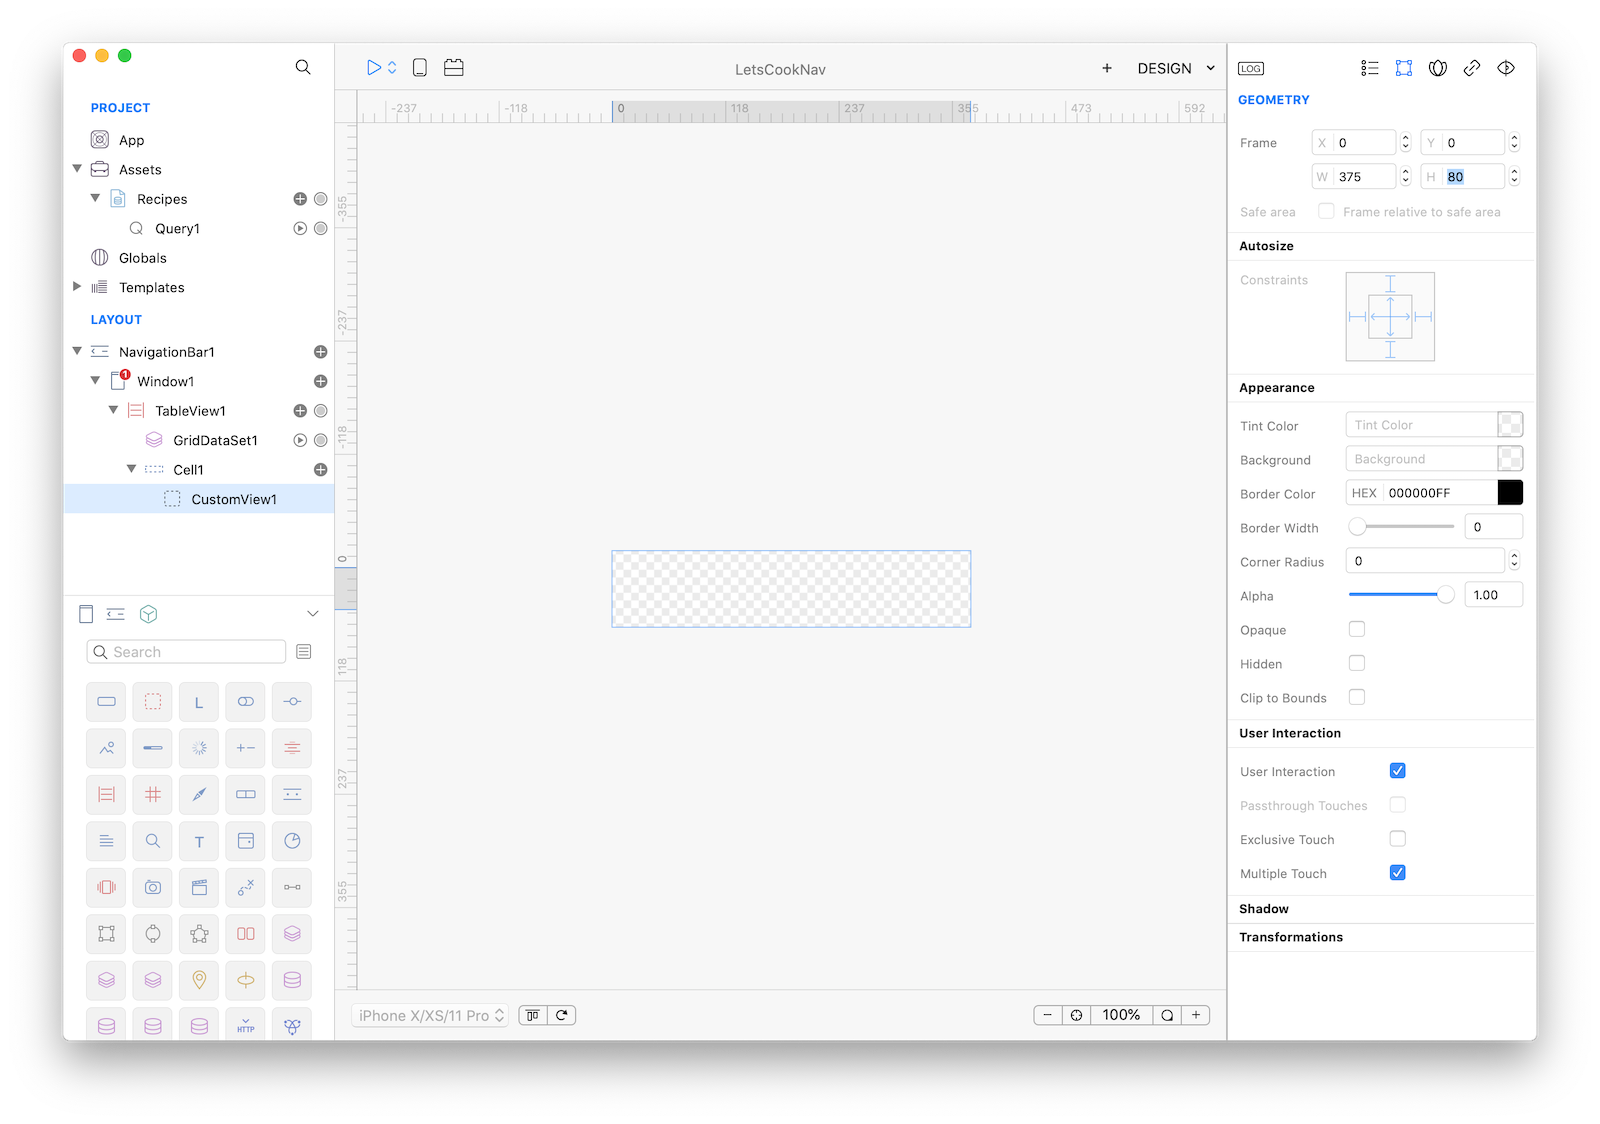
6 Configure the CustomView using set the height to 80 as shown in the screenshot:
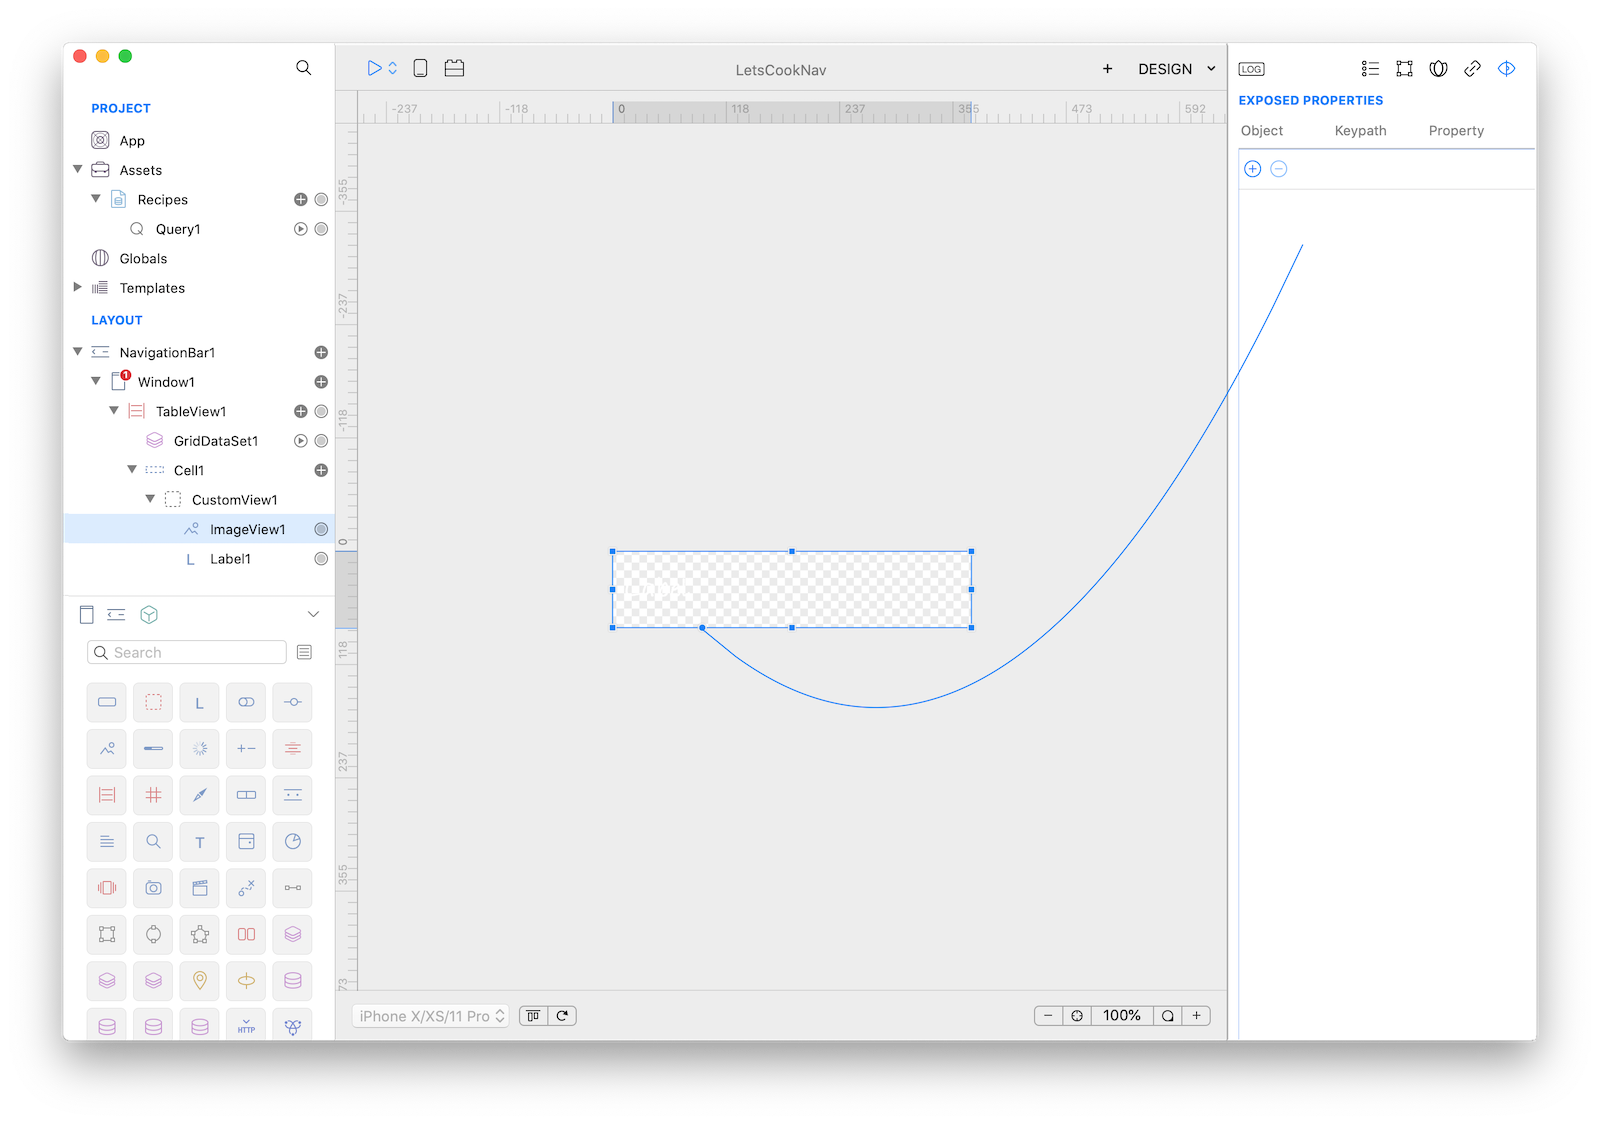
7 Drop an ImageView into the CustomView and configure it with the same frame of the CustomView and the constraints as shown in the screenshot:
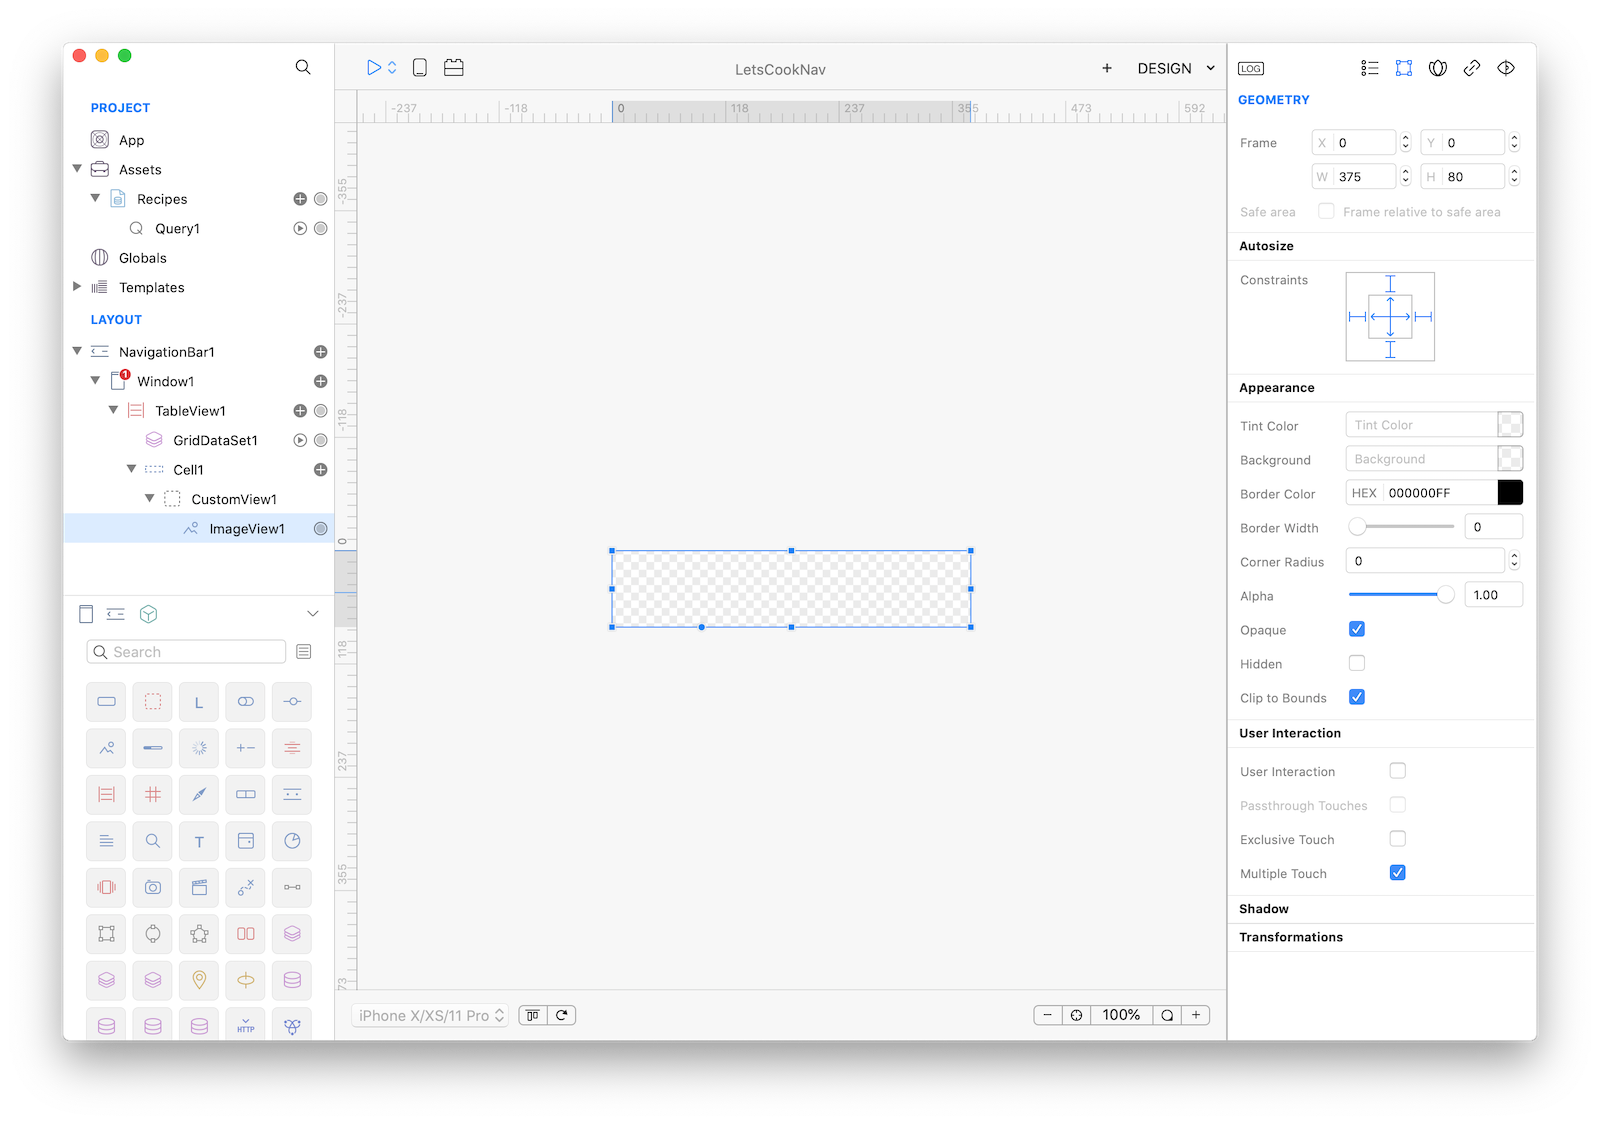
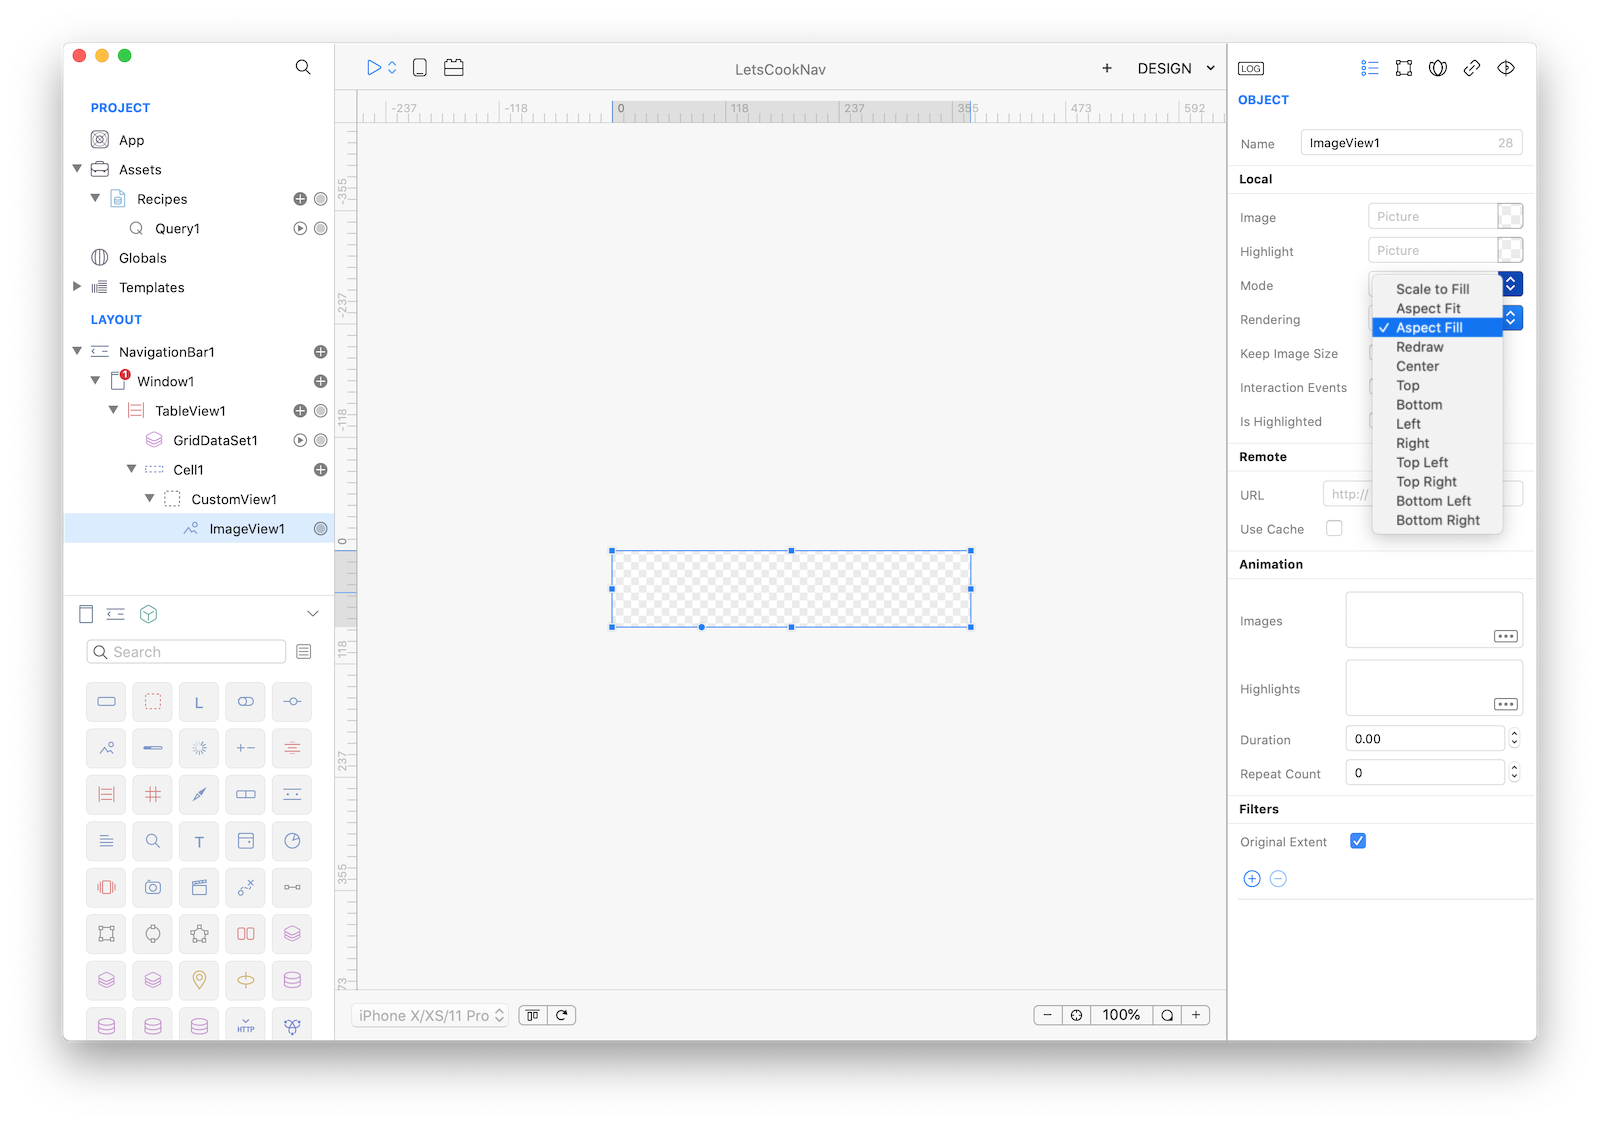
8 Go to the first Inspector panel (Object Properties) and change ImageView mode to "Aspect Fill":
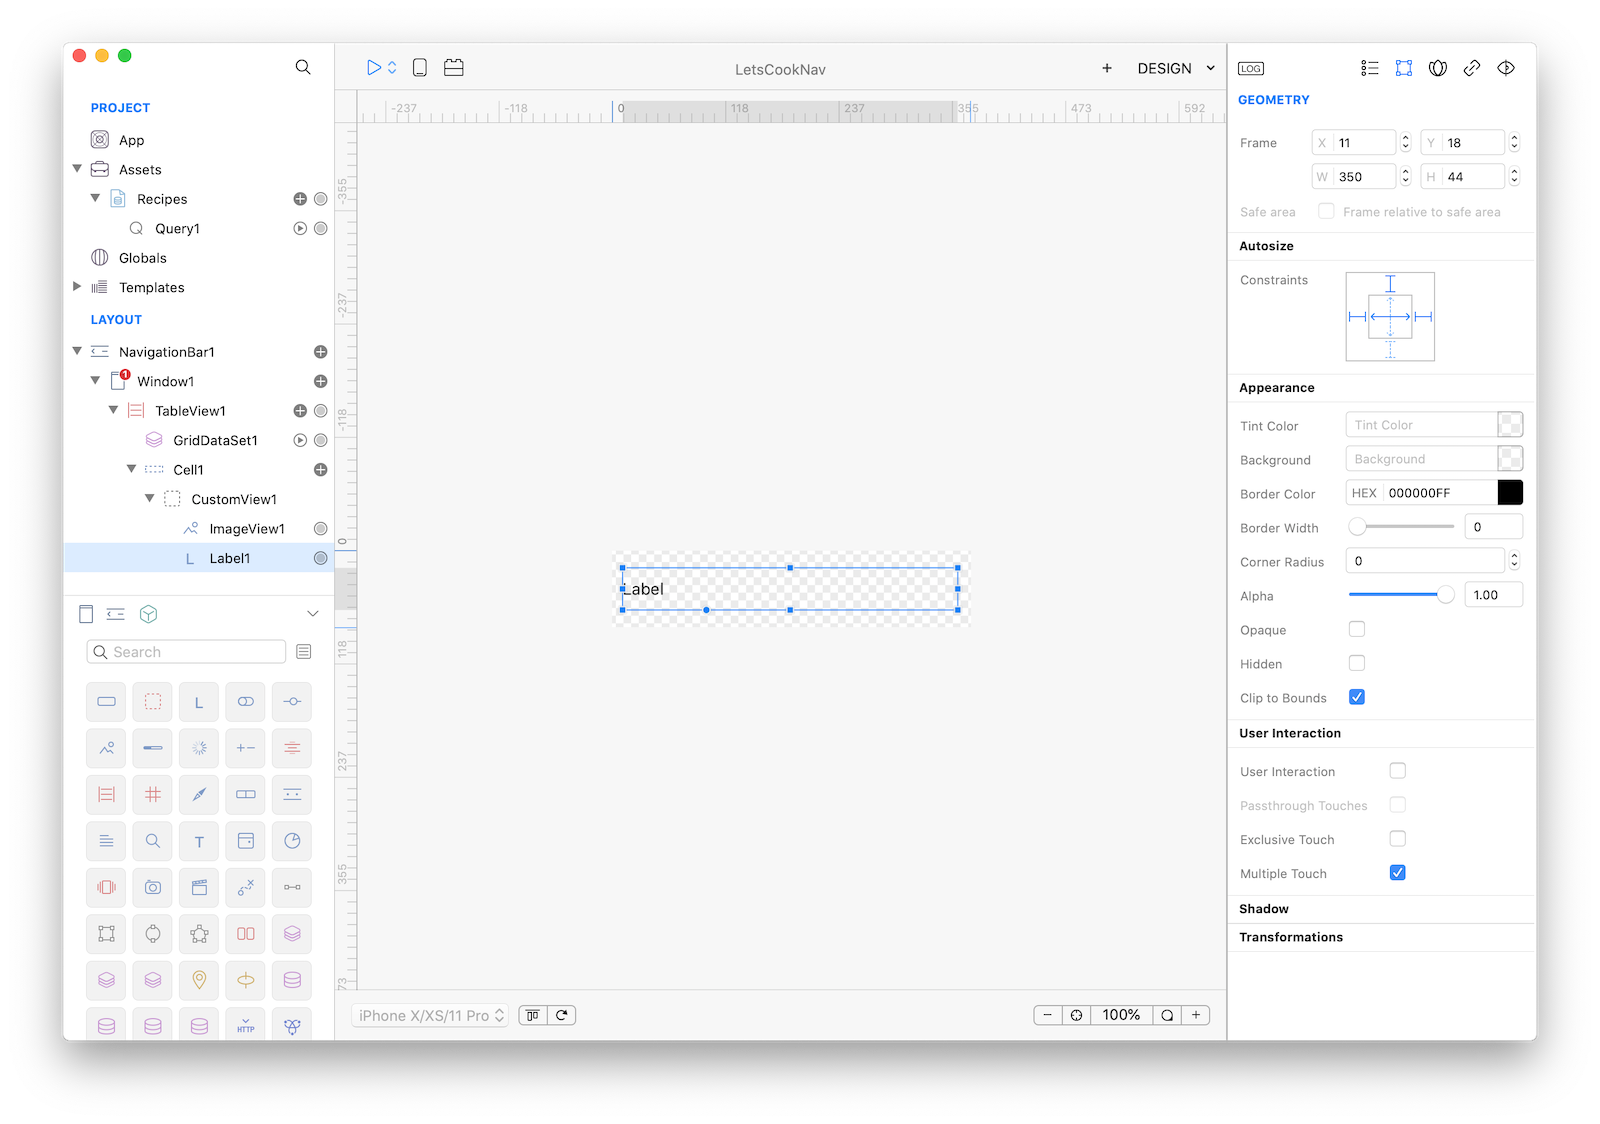
9 Drop a Label into the CustomView and configure it as shown in the screenshot:
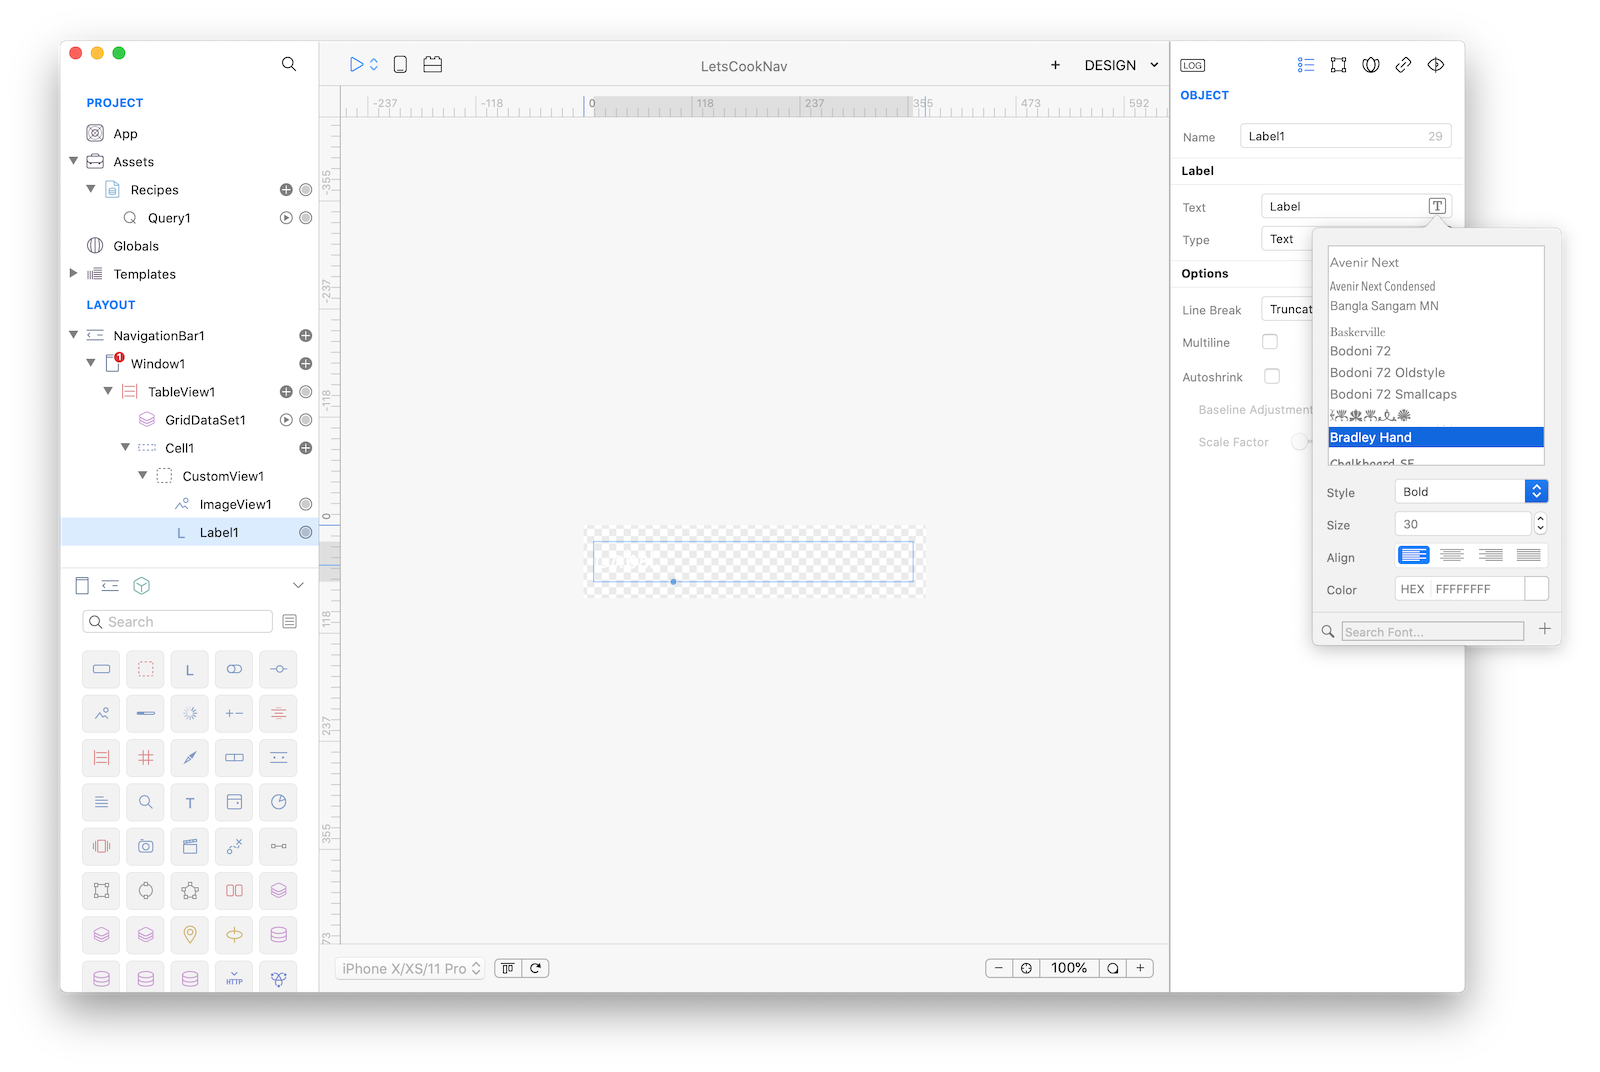
10 Go to the first Inspector panel (Object Properties) and change its typographic attributes as shown in the screenshot:
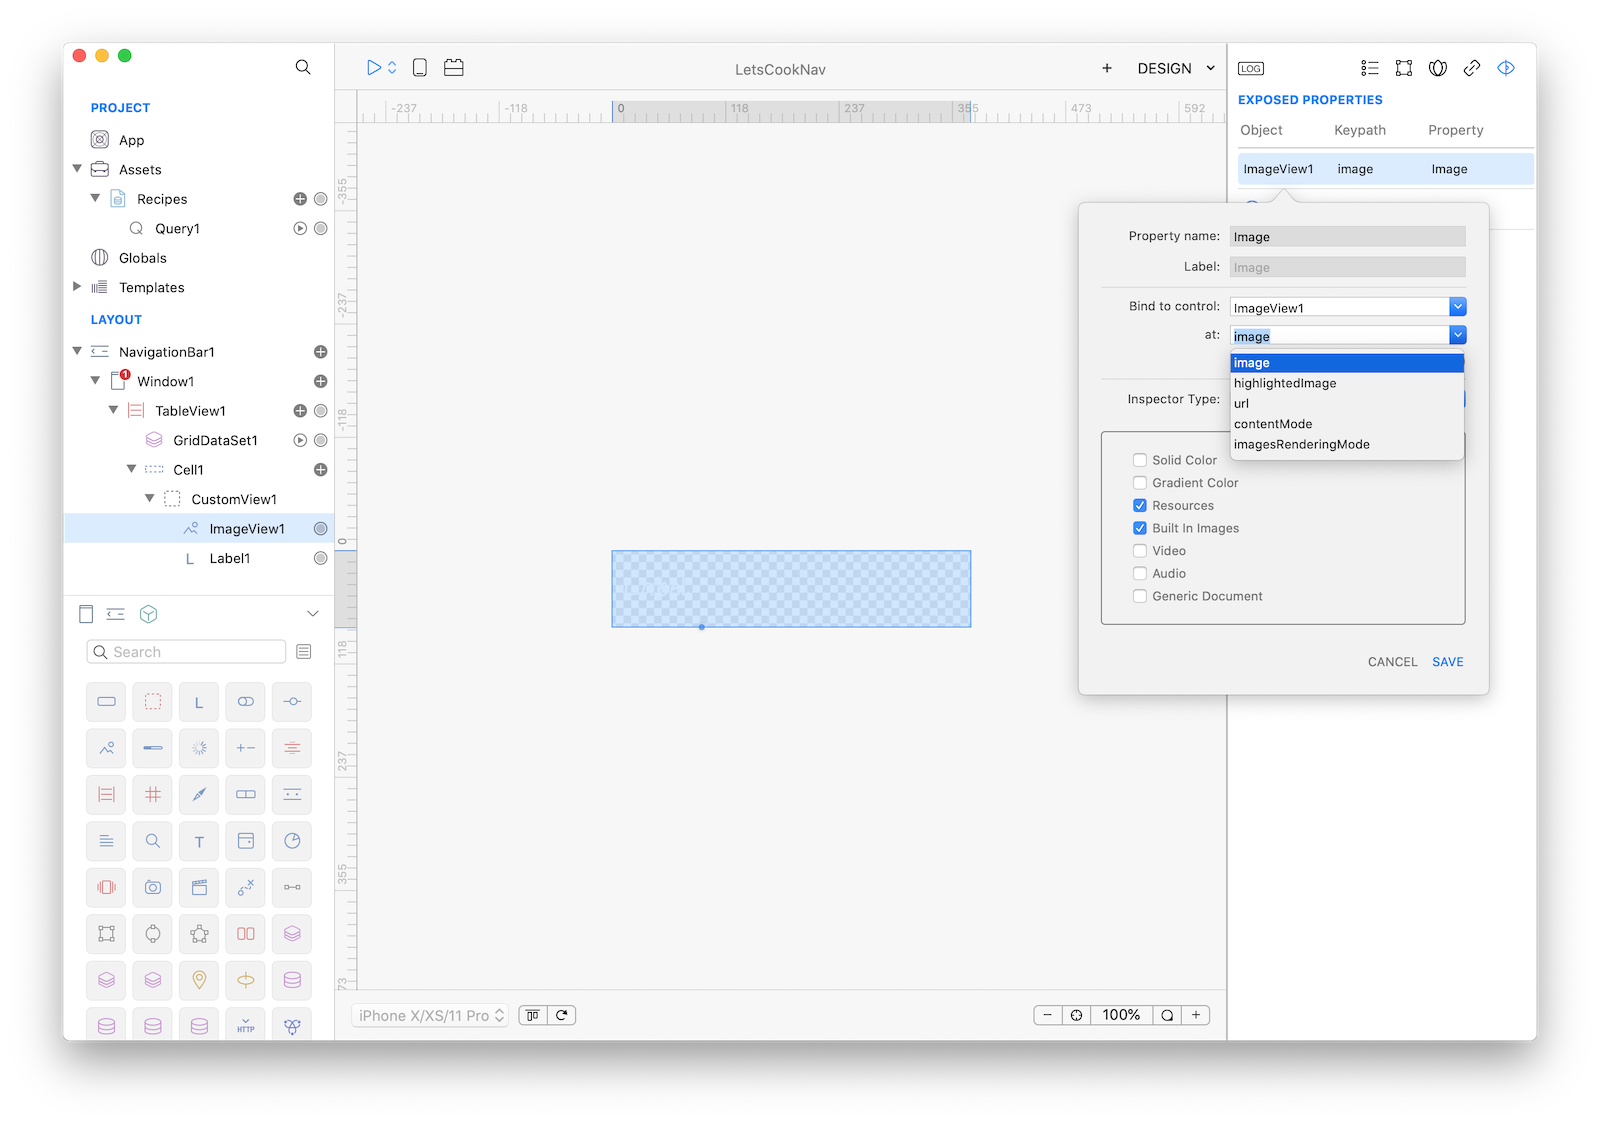
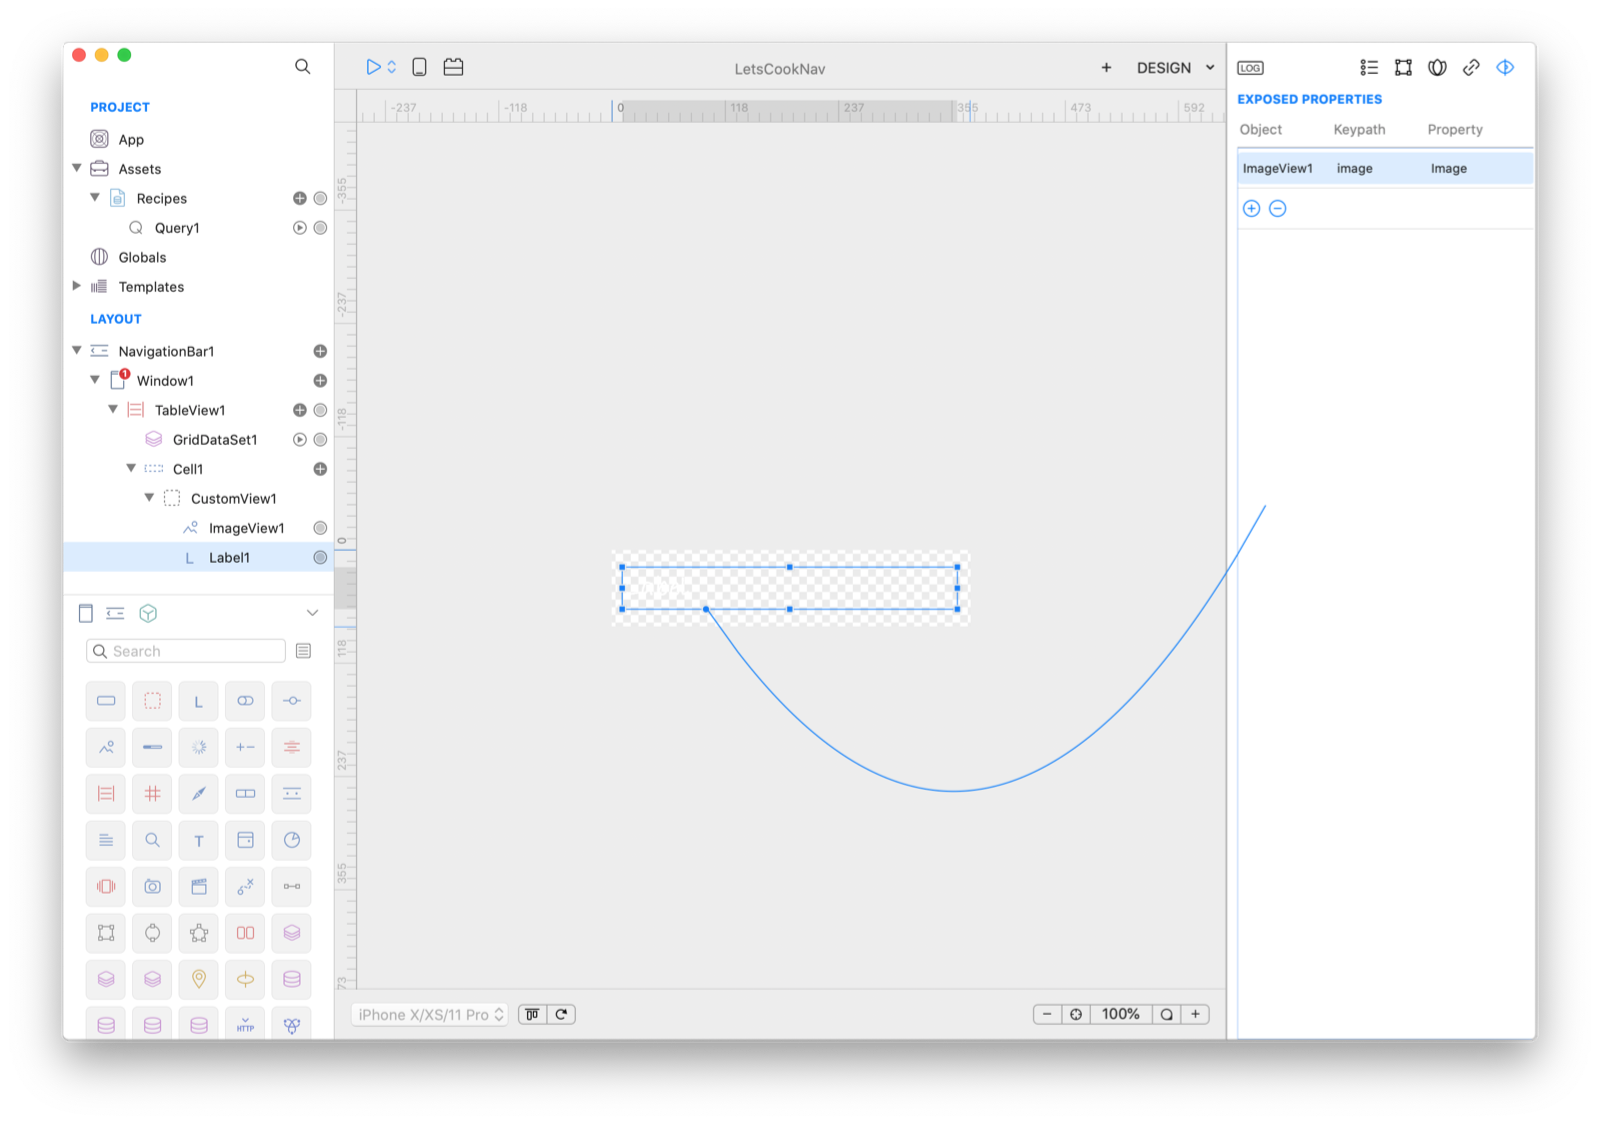
11 A CustomView is an object like any others and it can have its own properties and methods. It is now time to expose some properties to the outside. Select the Custom Properties panel into the Inspector and drag the binding knob from the ImageView:
12 Configure the exposed property to be named Image and to be internally bound to the ImageView1.image property:
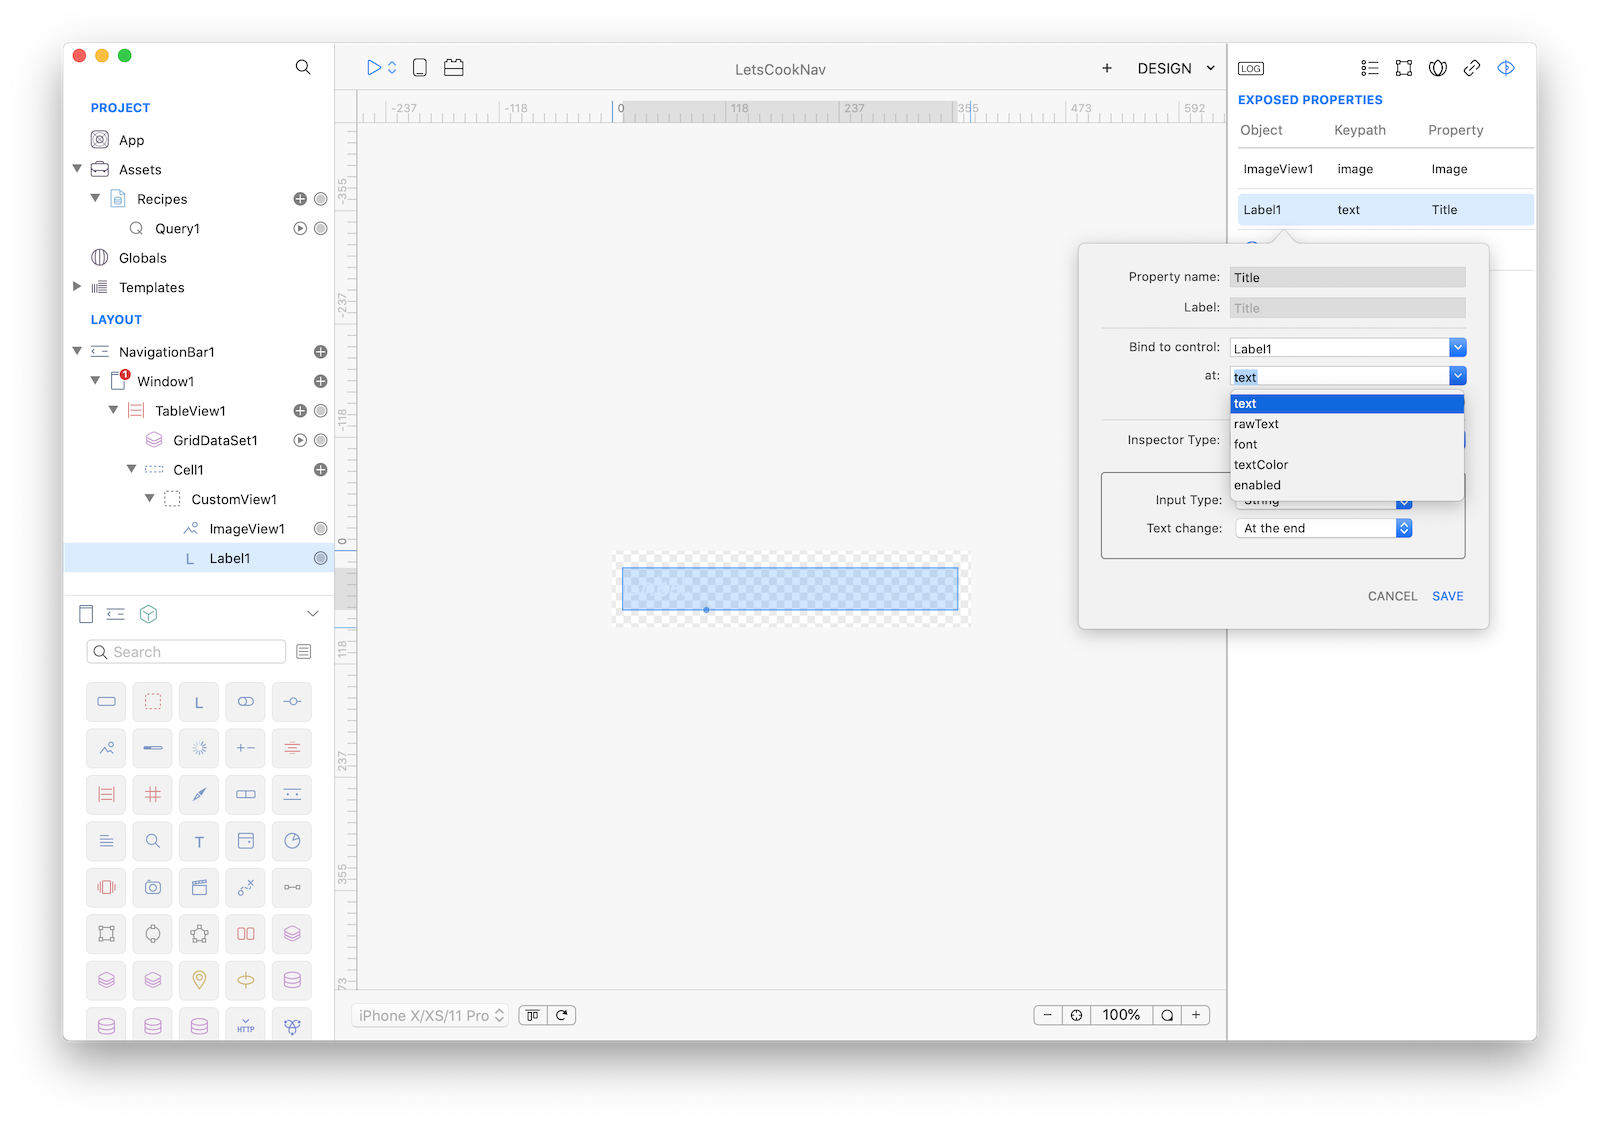
13 Do the same for the Label and drag the binding knob from the Label1:
14 Configure the exposed property to be named Title and to be internally bound to the Label1.text property:
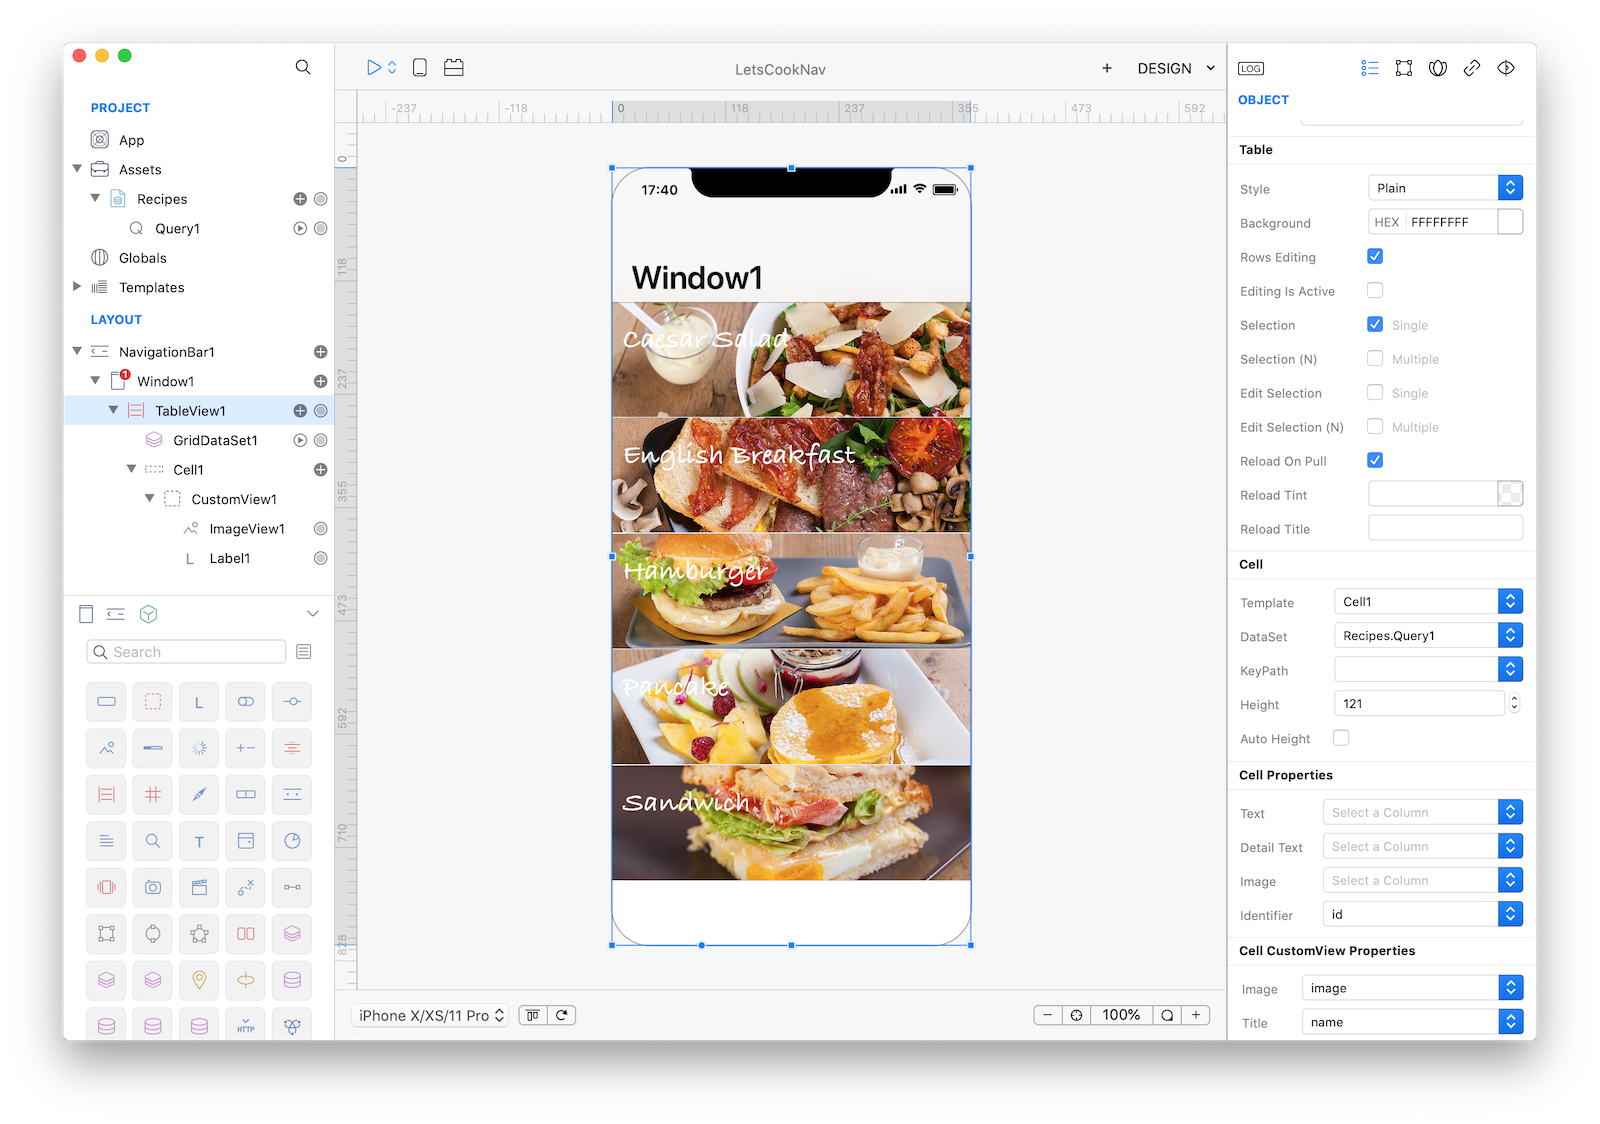
15 Connect your TableView with a CustomView and a DataSet. Here is where the magic happens. All you have to do is to configure the Cell, Cell Properties and Cell CustomView Properties sections into the Inspector. Identifier is a cell property that should be used to bind DataSet unique identifier, in the case of a database it is usually its primary key column. Image and Title are the two properties you just exposed from the TableCell custom view. The Text, Detail Text and Image properties in the Cell Properties section define the content of the default cell elements and they are not used in this case, so the values for these properties should be empty.
Also adjust the value of the Height property to 121.
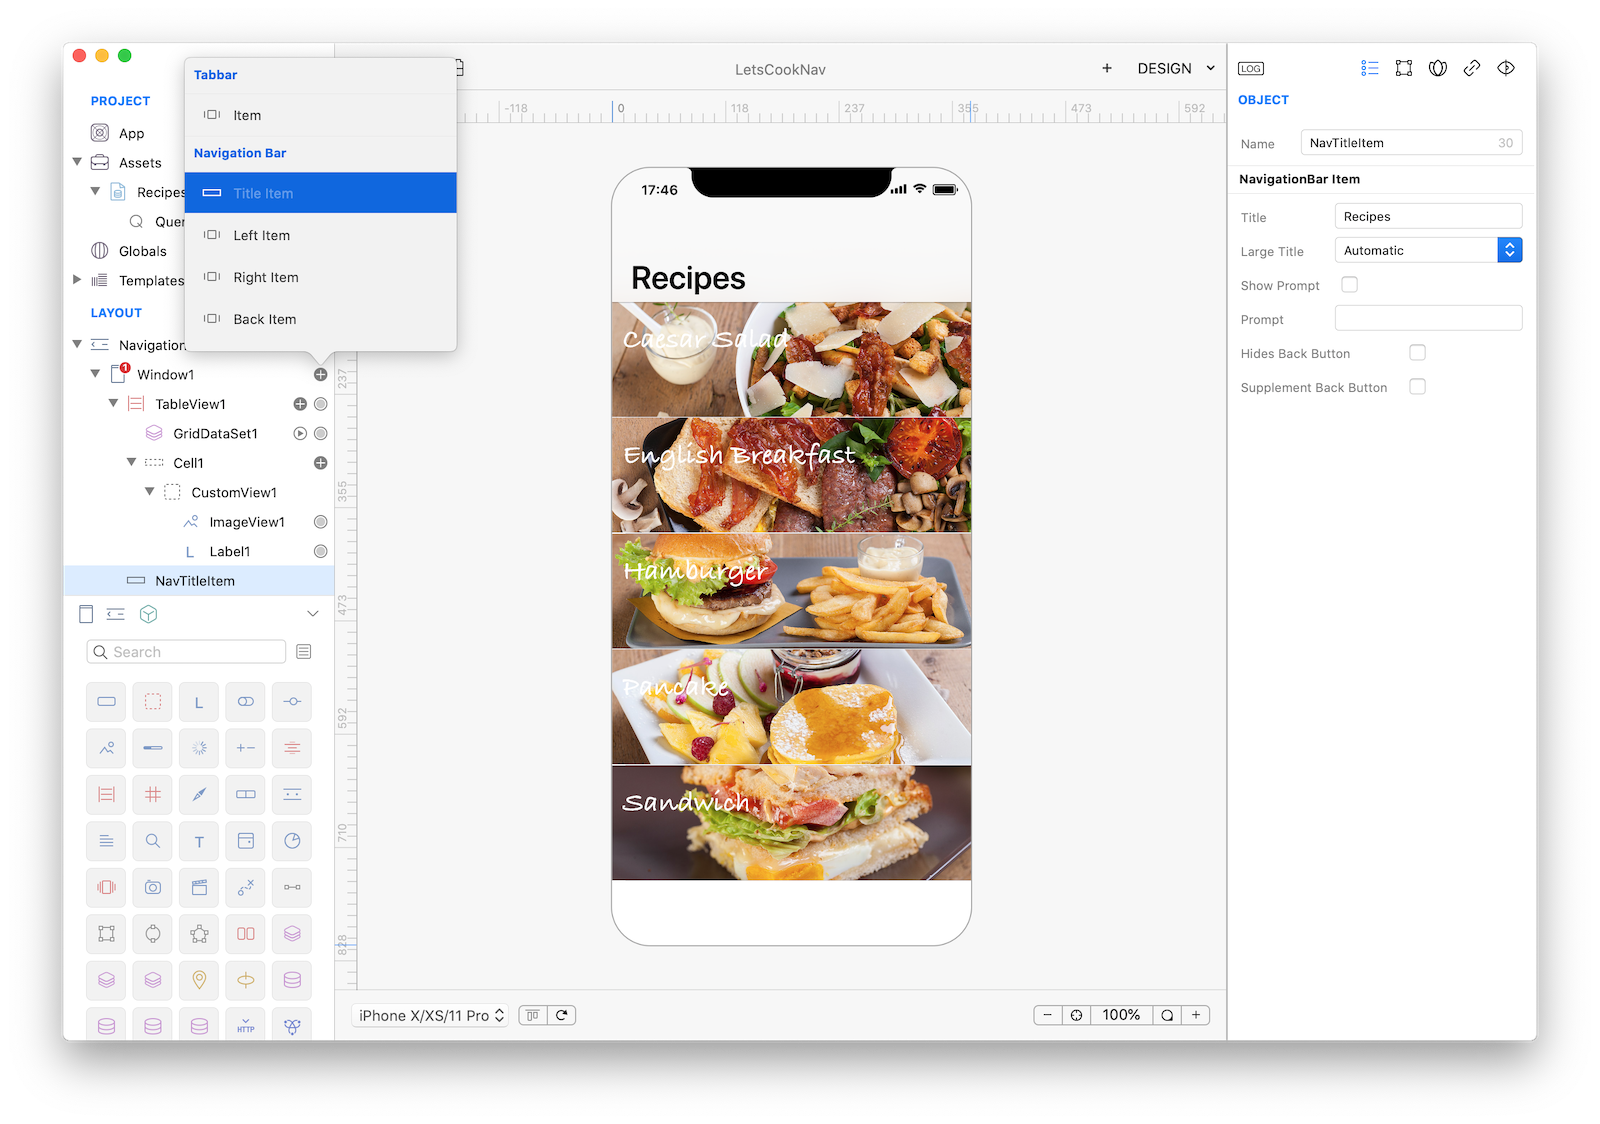
16 As you can see from the NavigationBar, the Window1 title is inherited from the current window name. It would be better to have a more appropriate Recipes title. You can change this property setting by adding a Navigation Bar Title Item and customize its title property (Another way would be to rename the Window1 instance in the Layout panel to Recipes).
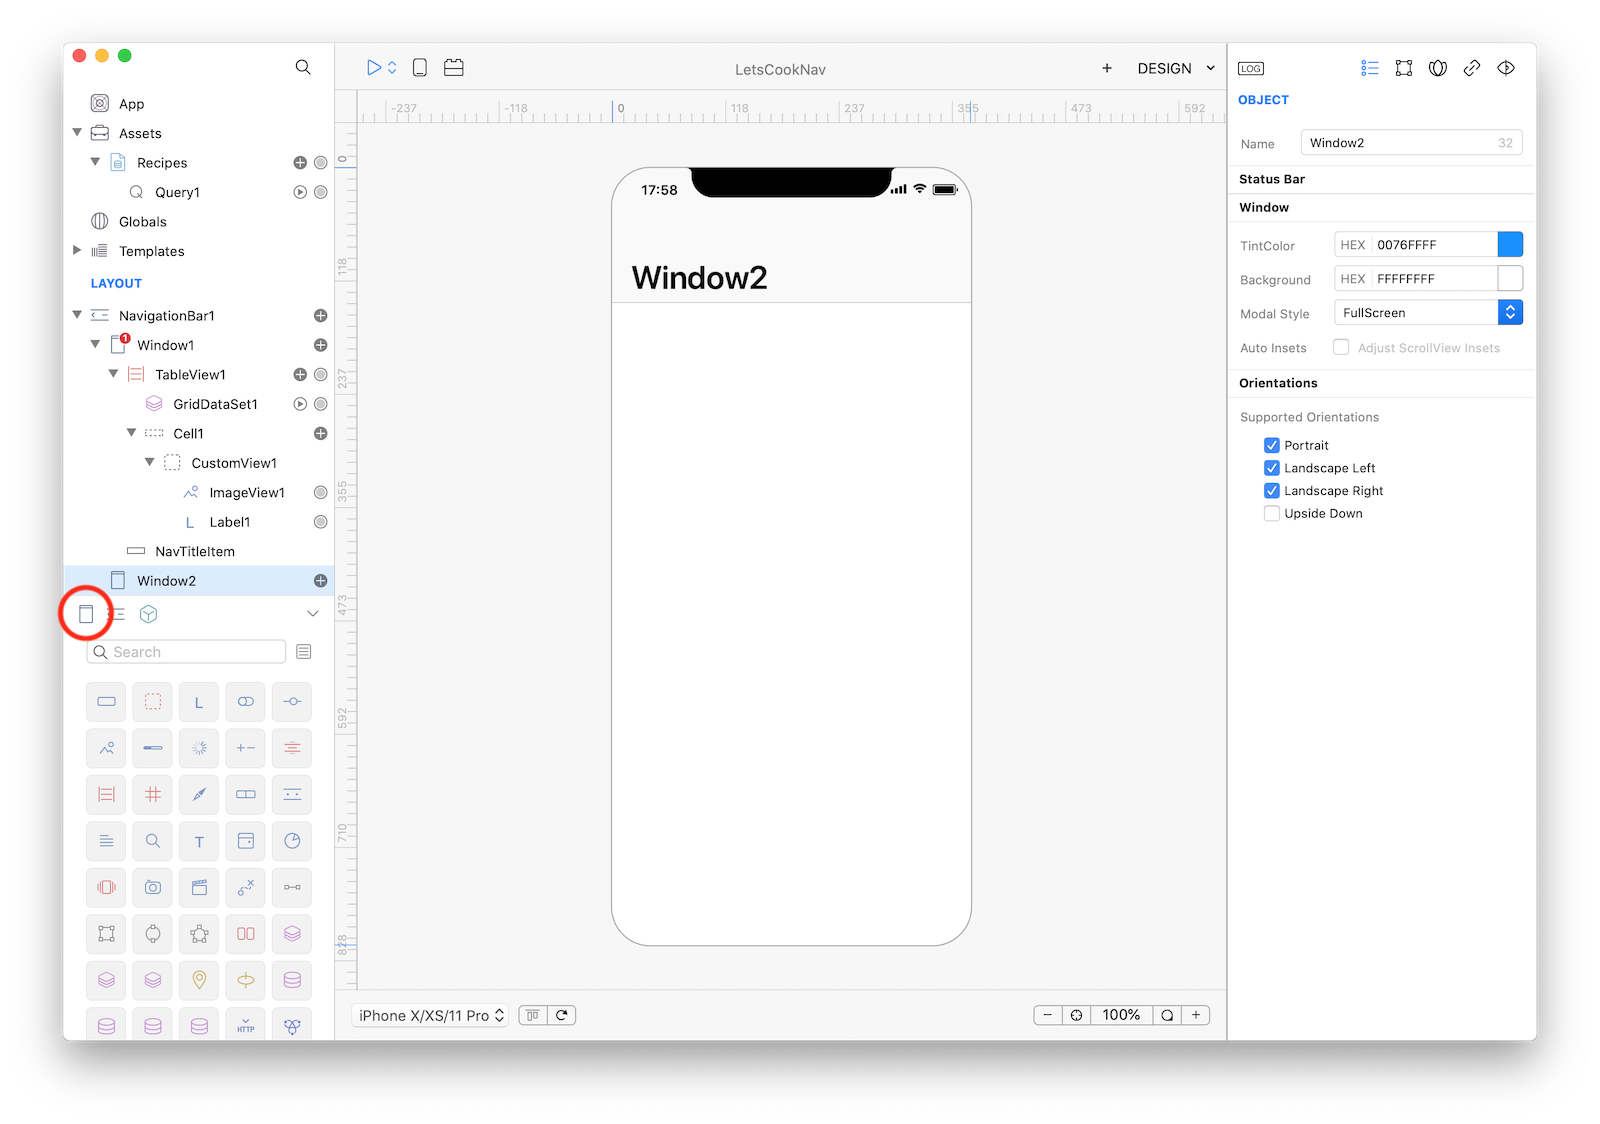
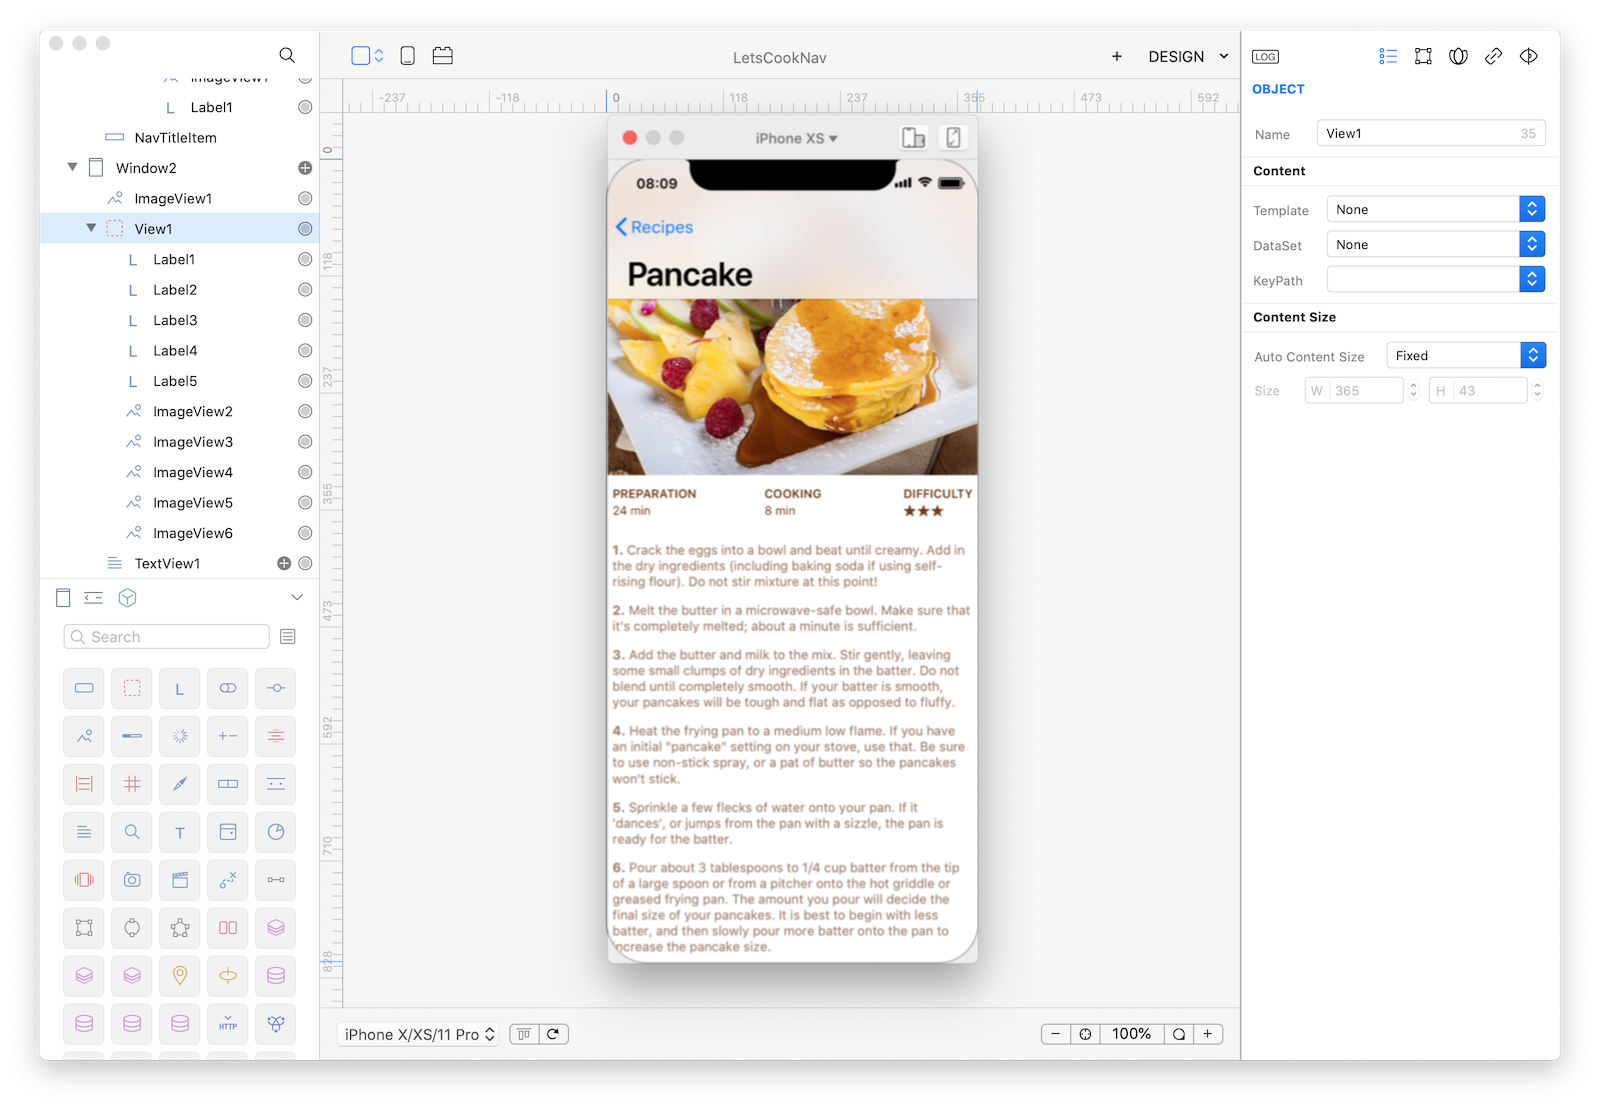
17 The first selection window is now completed, we now need to create a window that can contains the details of the selection. Start by creating a new Window:
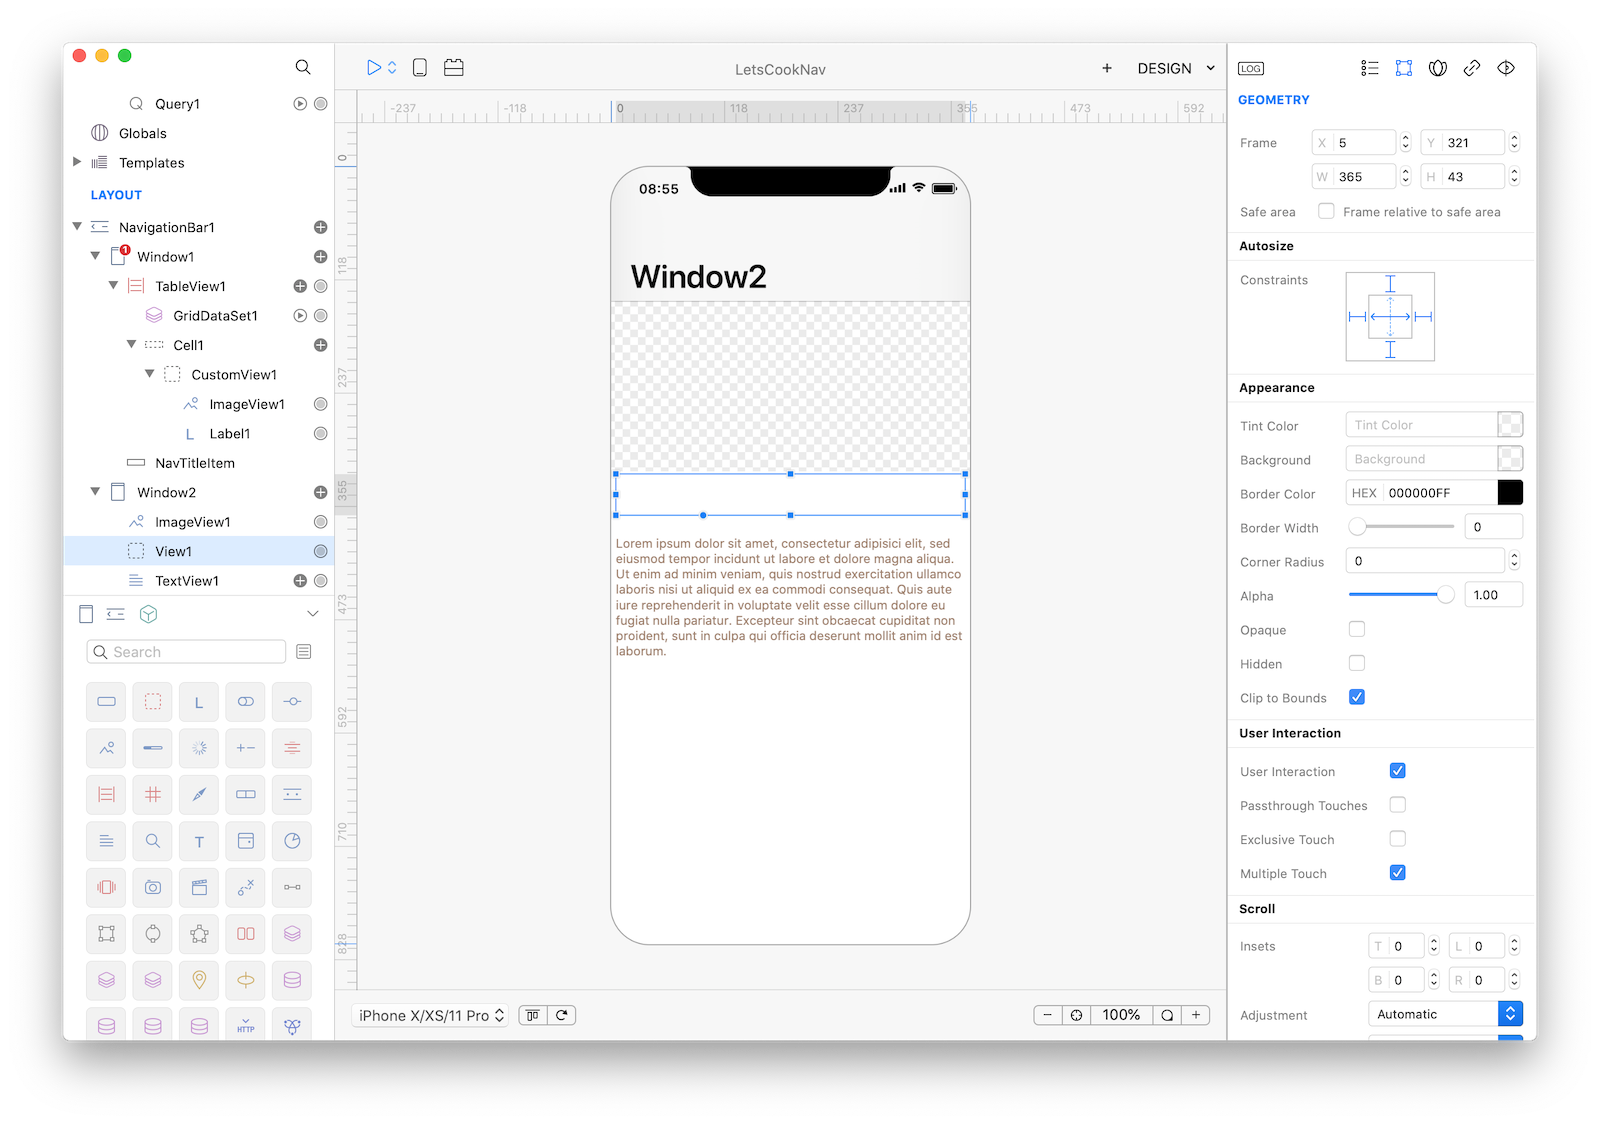
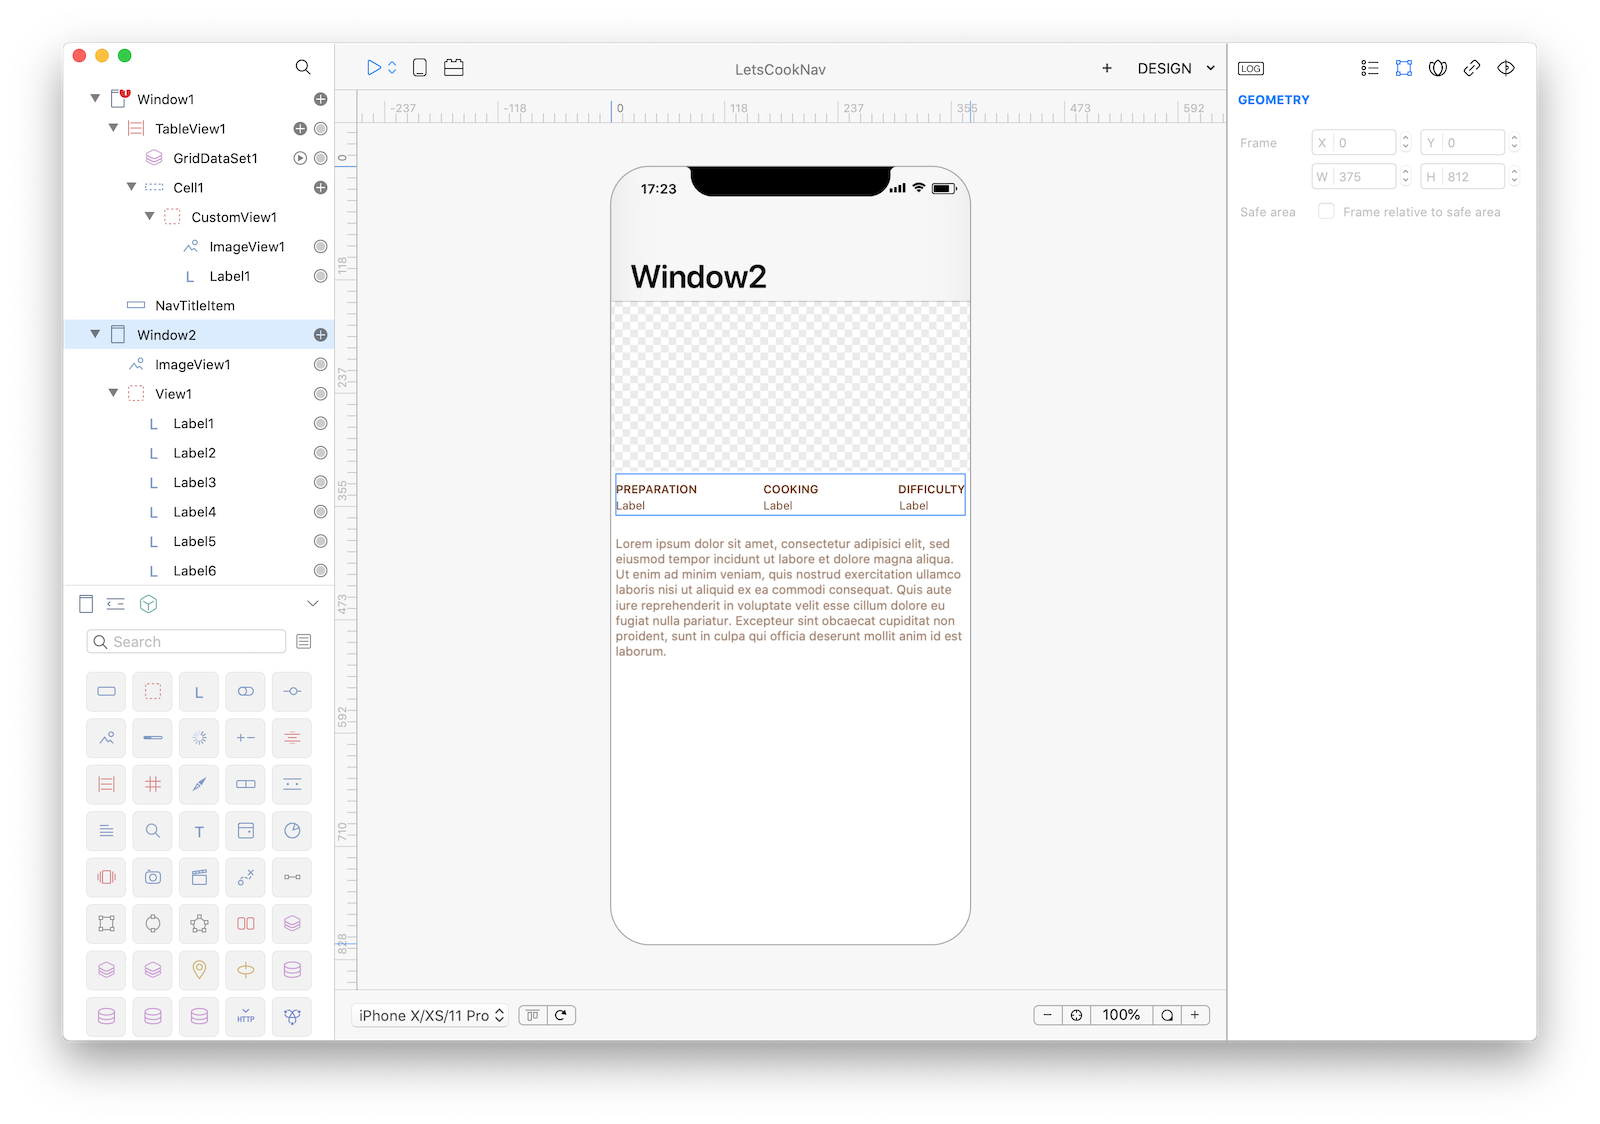
18 Drag an ImageView, a TextView and a View into Window2 and set the following properties:
| Object | Property | Value |
|---|---|---|
| ImageView1 | Mode | Aspect Fill |
| ImageView1 | Frame | x:0 y:0 w:375 h:317 |
| TextView1 | Type | Markdown |
| TextView1 | Frame | x:0 y:375 w:375 h:437 |
| TextView1 | Typography | System Regular, 13 color: #5D2801 |
| View1 | Frame | x:5 y:321 w:365 h:43 |
Window2 should look like:
19 What we would like to achieve is to load details about the recipe the user selected in Window1, so we need a way to tell Window2 what recipe the user selected. A Window is an object (like any others in Creo) that can have methods and properties and a property is what we really need here. Start by selecting Window2 and then open the Code Editor:
20 To create a new property press the + button near the Properties label. A var1 property is created, rename it to identifier (editing its name near the var label):

The Window2 object has now an identifier property that you can access via code using the dot notation: Window2.identifier. This property will be used to store the identifier of the selected cell from Window1.
21 We now need to find out a way to get notified every time a user selects a row into a TableView. If you read the TableView documentation you can see that it has a DidSelectCell event. So, select TableView1 inside Window1, expand the Events tab and select the DidSelectCell event.
The first parameter is the cell that the user selected and it has an identifier property (bound to the query identifier in this case). Write the following code to set Window2 identifier property and to open Window2 inside a Navigation control:
Window2.identifier = cell.identifier;
Window2.open();
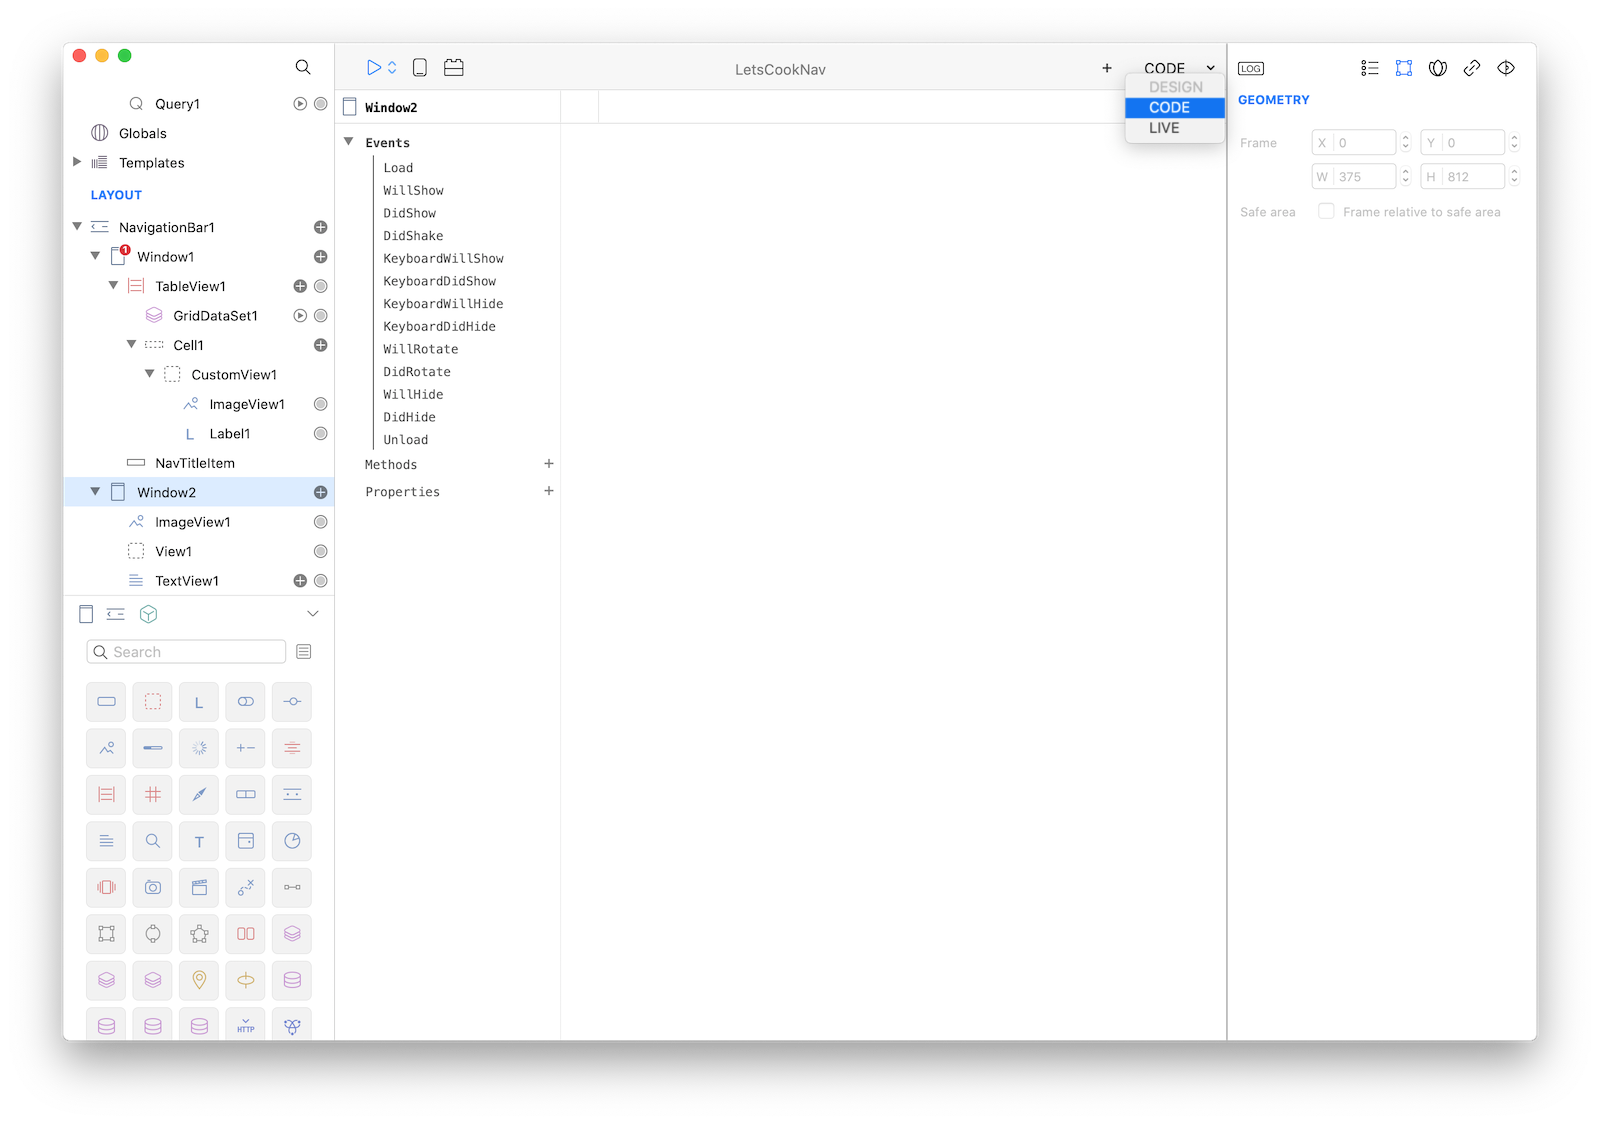
22 With the code just written each time a user selects a row into the TableView1, the Window2 identifier property is set to the cell's identifier and Window2 is then opened. We now need to perform a query to extract the right row from the database based on this identifier. If you read the Window documentation you can see that it has a WillShow event called each time the Window is about to be displayed. Seems the perfect place to write our code. So, select Window2, expand the Events tab and select the WillShow event.
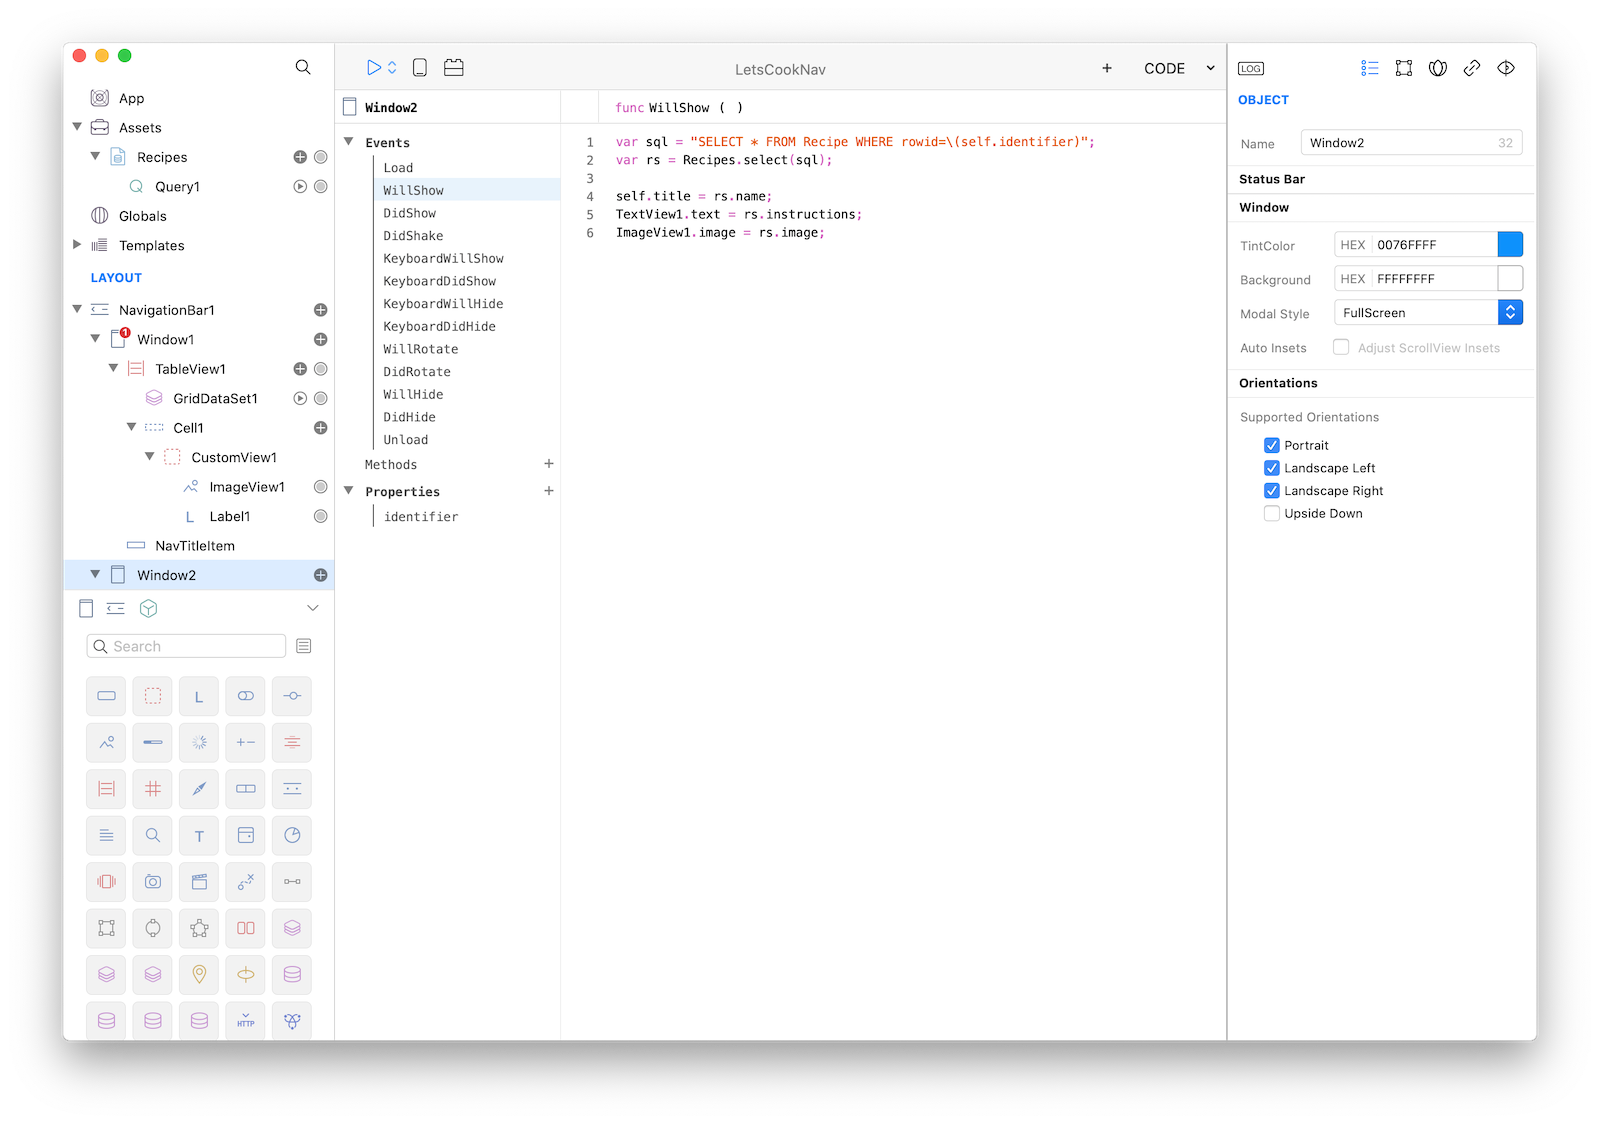
The following code will perform a new query based on the current identifier property:
var sql = "SELECT * FROM Recipe WHERE rowid=\(self.identifier)";
var rs = Recipes.select(sql);

self.title = rs.name;
TextView1.text = rs.instructions;
ImageView1.image = rs.image;
This code contains several advanced concepts:
- Variable sql is built using string interpolation
- The Recipes database object contains a select method that you can use to perform sql queries
- Value returned by a select statement is a SQLite RecordSet
- You can access columns of a RecordSet using the names of the columns
- Since we are writing code inside the Window2 object, self refers to Window2 and self.title is used to change the title of the Window at runtime
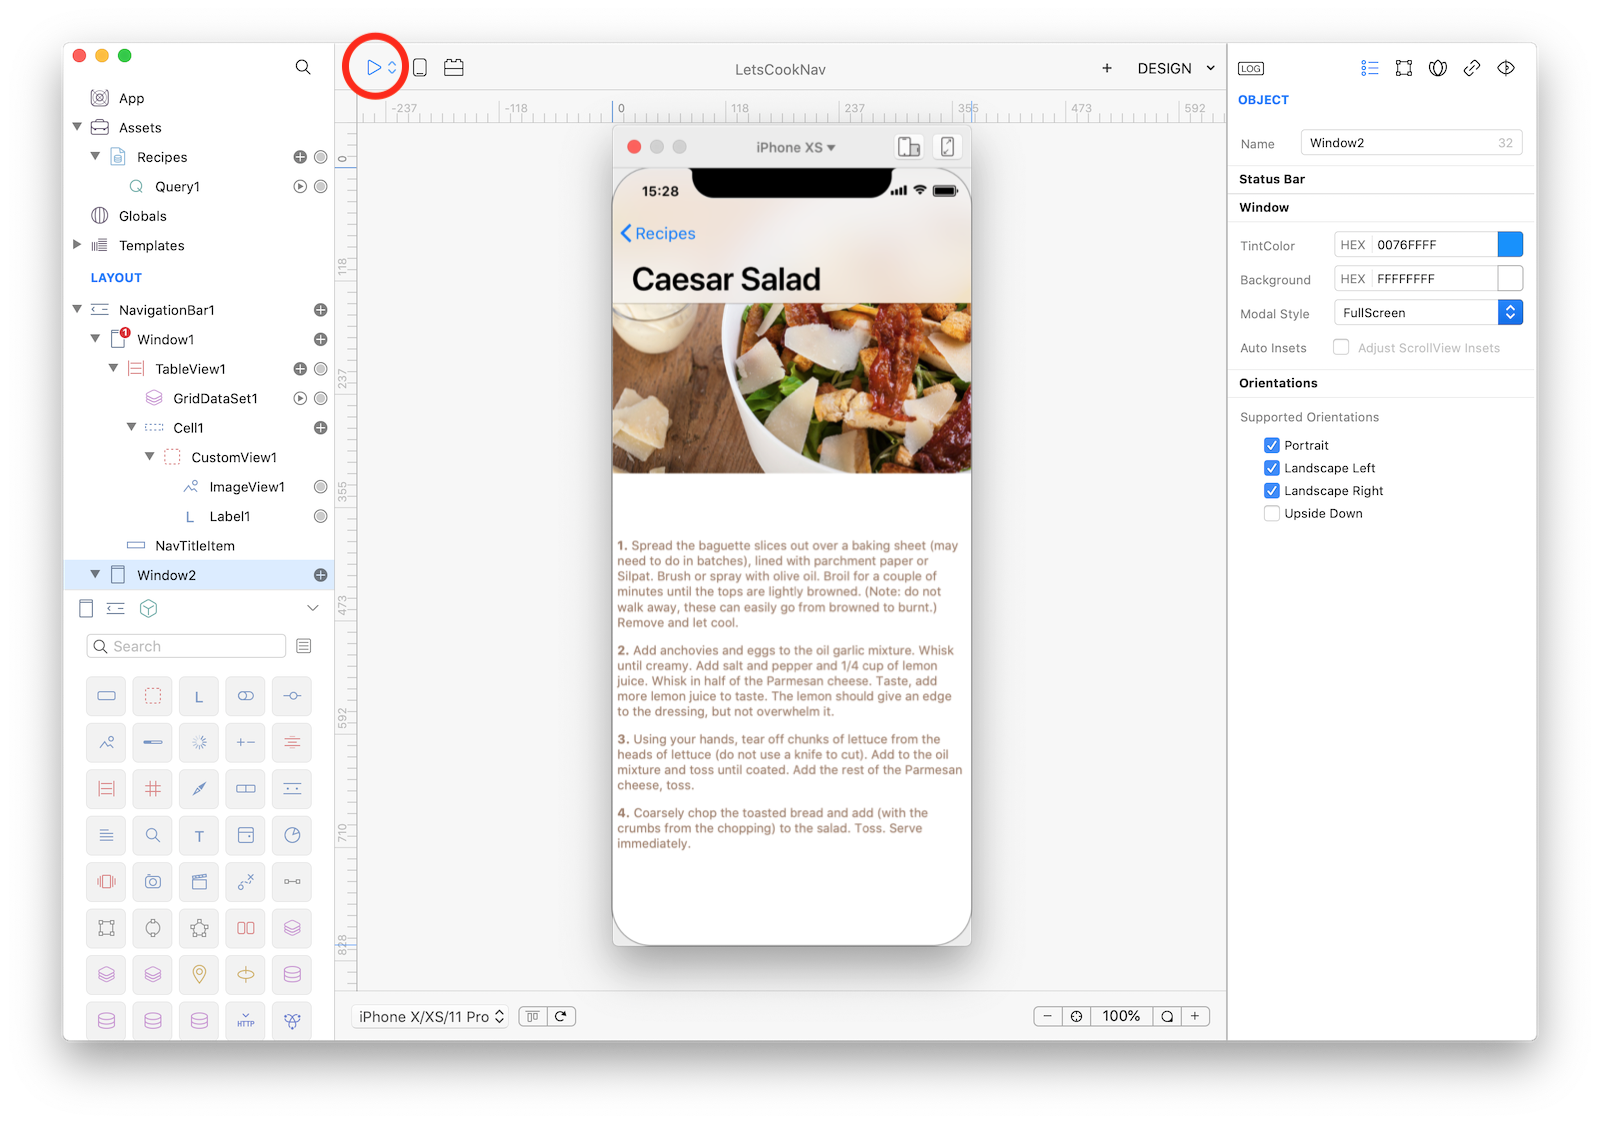
23 You can now test your app using Creo Simulator:
24 Just one final part is missed for a fully featured app, the Recipe table contains more details that need to be displayed. We'll add some controls inside the Window2.View1 to show three numeric fields from the Recipe table: preparation_time, cooking_time and difficulty. These columns contains numeric values but we'd like to display them with their proper unit of measure, that's the reason why we'll use computed properties here.
Start by dragging six Labels into the View1 and set the following properties:
| Object | Property | Value |
|---|---|---|
| Label1 | Text | PREPARATION |
| Label1 | Typography | System Bold, 12 Color: #703B14 |
| Label1 | Frame | x:0 y:0 w:100 h:32 |
| Label2 | Text | COOKING |
| Label2 | Typography | System Bold, 12 Alignment: center Color: #703B14 |
| Label2 | Frame | x:133 y:0 w:100 h:32 |
| Label3 | Text | DIFFICULTY |
| Label3 | Typography | System Bold, 12 Alignment: right Color: #703B14 |
| Label3 | Frame | x:265 y:0 w:100 h:32 |
| Label4 | Typography | System Regular, 12 Color: #703B14 |
| Label4 | Frame | x:0 y:17 w:100 h:32 |
| Label5 | Typography | System Regular, 12 Color: #703B14 |
| Label5 | Frame | x:154 y:17 w:100 h:32 |
| Label6 | Typography | System Regular, 12 Color: #703B14 |
| Label6 | Frame | x:295 y:17 w:70 h:32 |
Label1, Label2 and Label3 will be used to display a title, while Label4, Label5 and Label6 will be used to display the value from the database query. Your custom view should looks like:
In the TableCell custom view we dragged the binding knob in order to expose properties but this time we need to perform an operation before displaying the value into the Label (we want to append the " min" unit of measure to the numeric value), so we need to proceed in a different way.
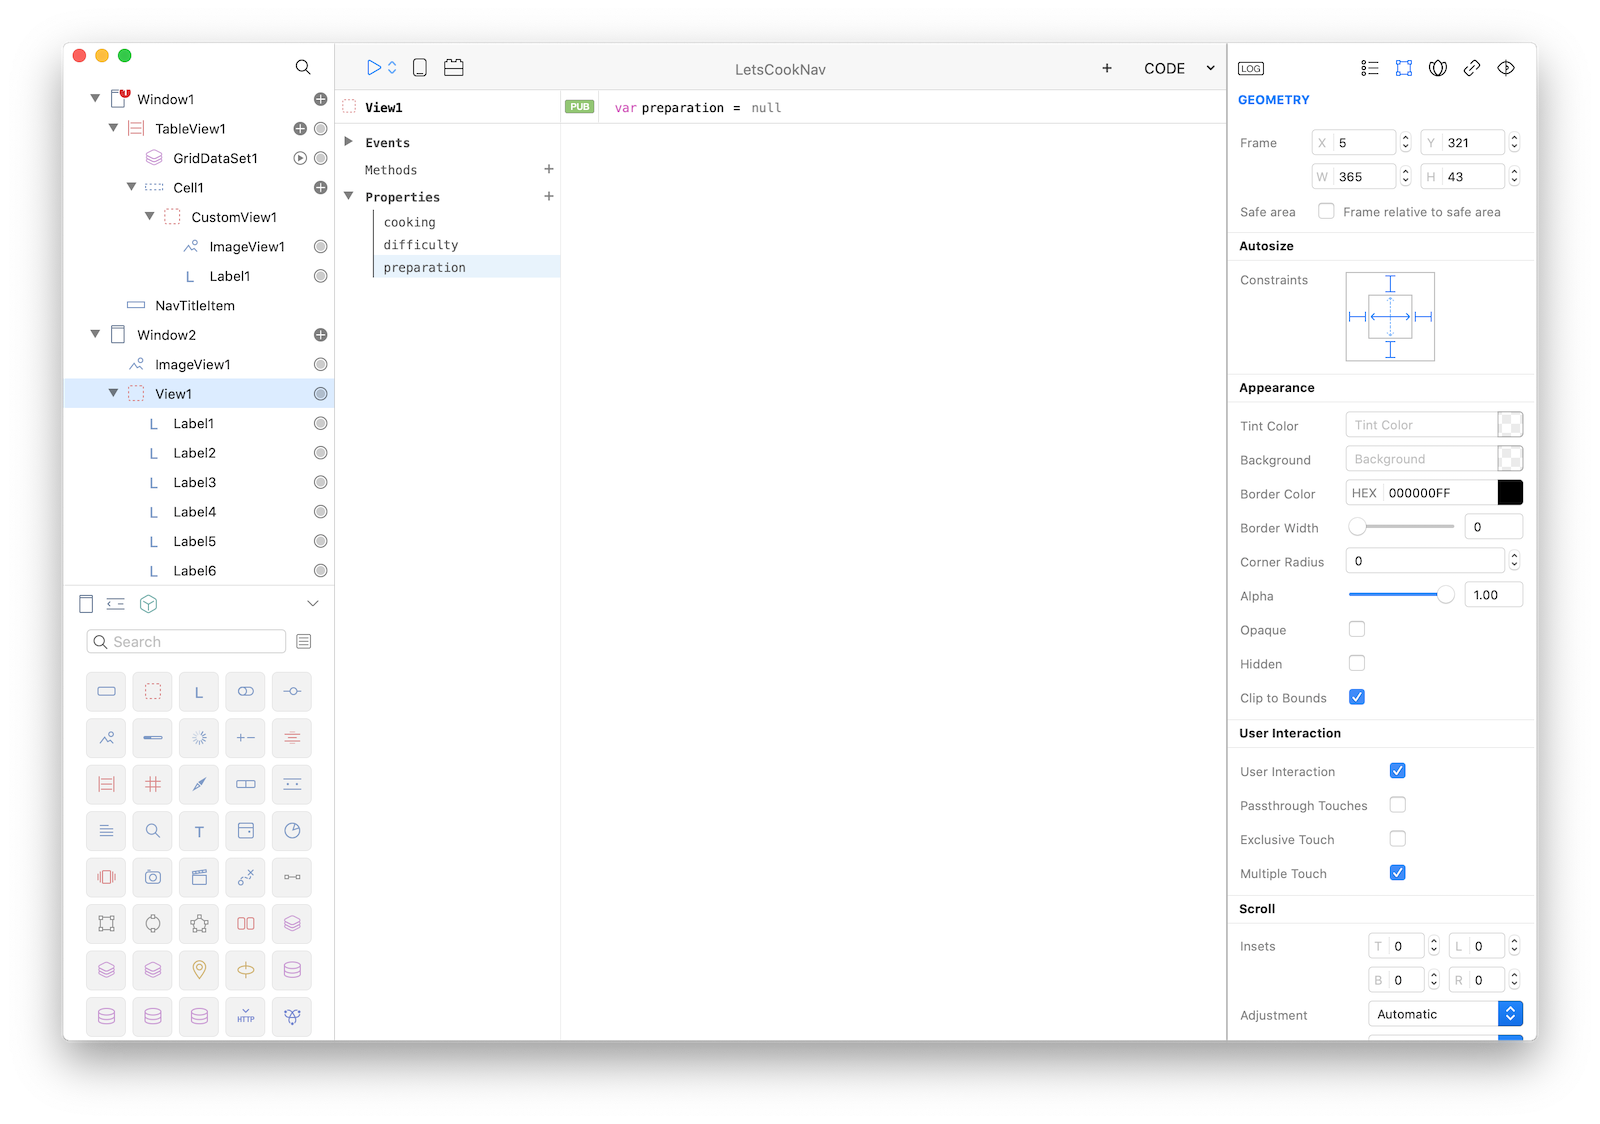
Select the View1 and add three properties, then renames these properties to cooking, difficulty and preparation:
Then right click on each of them and select "Convert to Computed Property" from the contextual menu:
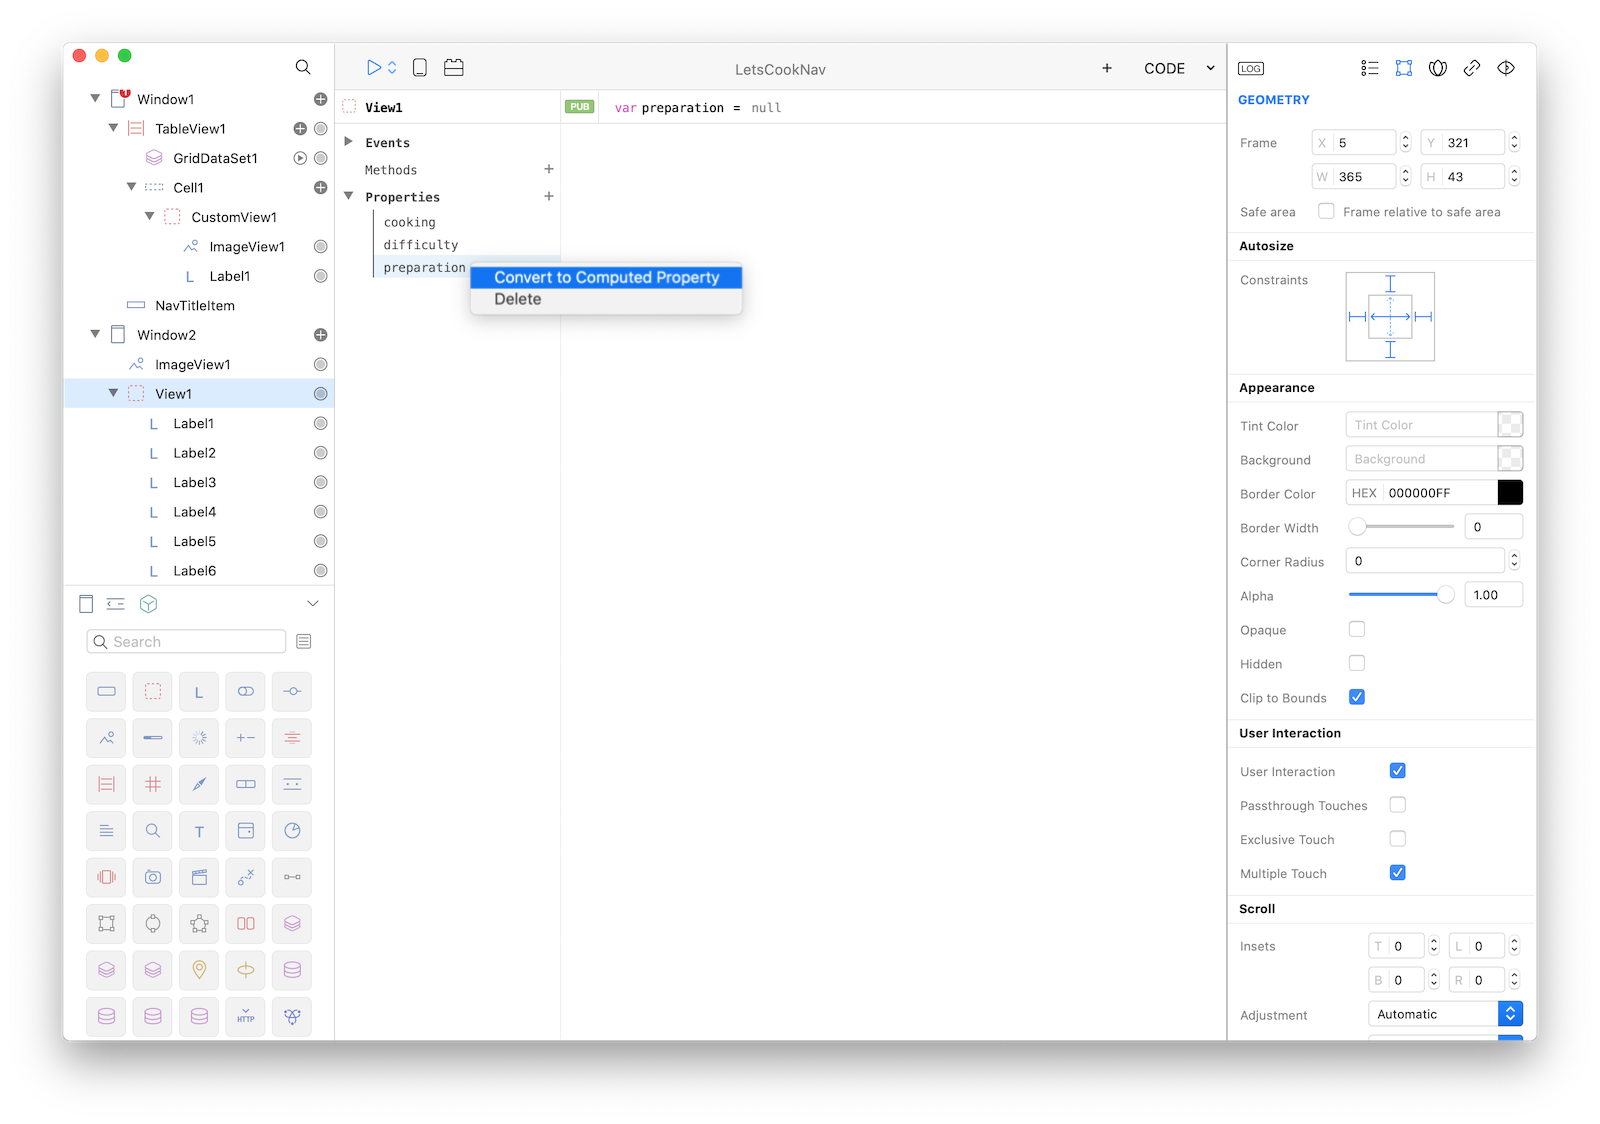
You'll end up with some automatic code written for your properties:
25 A Computed Property is a way to execute some code each time a property value is read or written and it is exactly what we was looking for.
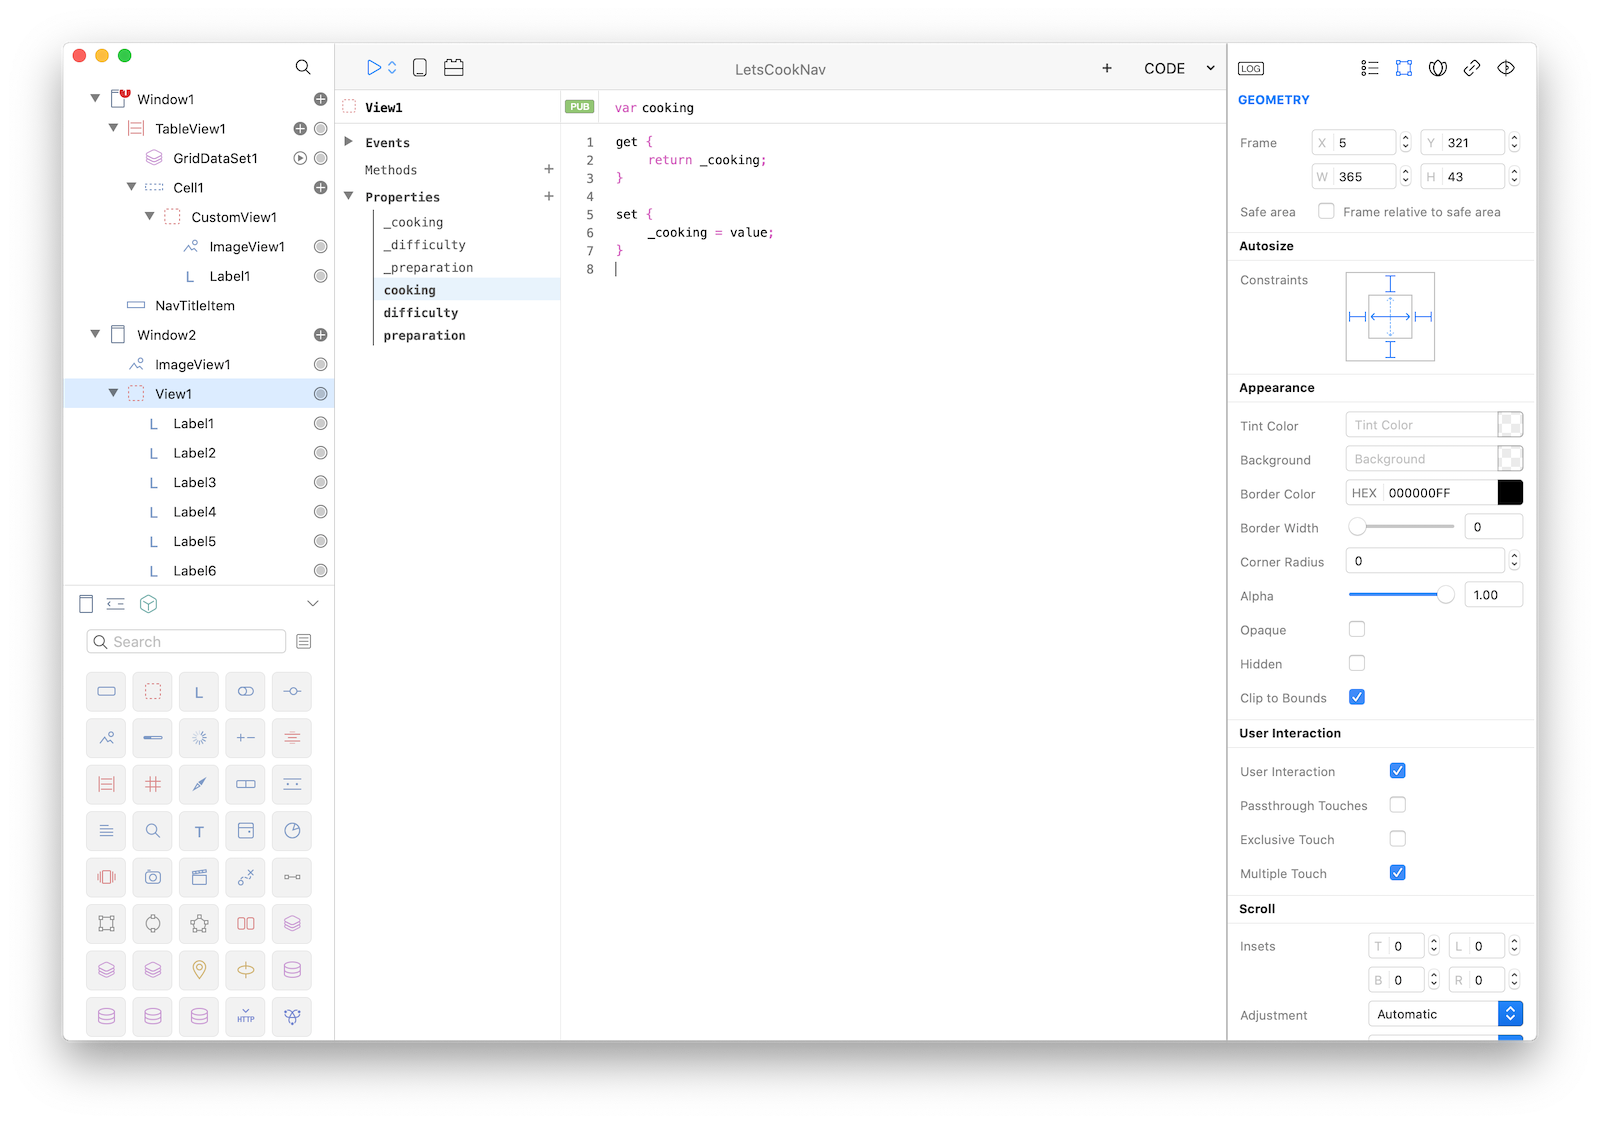
Write the following code in the preparation property:
get {
    return _preparation;
}

set {
    _preparation = value;
    Label4.text = "\(value) min";
}
write the following code in the cooking property:
get {
    return _cooking;
}

set {
    _cooking = value;
    Label5.text = "\(value) min";
}
and write the following code in the difficulty property (even if for this value we could have directly exposed the Label6.text property but we'll return to this later):
get {
    return _difficulty;
}

set {
    _difficulty = value;
    Label6.text = "\(value)";
}
With this code, each time a numeric cooking or preparation value is set its corresponding Label is set with the string " min" appended.
26 Modify the code in WillShow event (in Window2) to include the setters for the View1 new properties we just added to View1:
var sql = "SELECT * FROM Recipe WHERE rowid=\(self.identifier)";
var rs = Recipes.select(sql);

self.title = rs.name;
TextView1.text = rs.instructions;
ImageView1.image = rs.image;

View1.preparation = rs.preparation_time;
View1.cooking = rs.cooking_time;
View1.difficulty = rs.difficulty;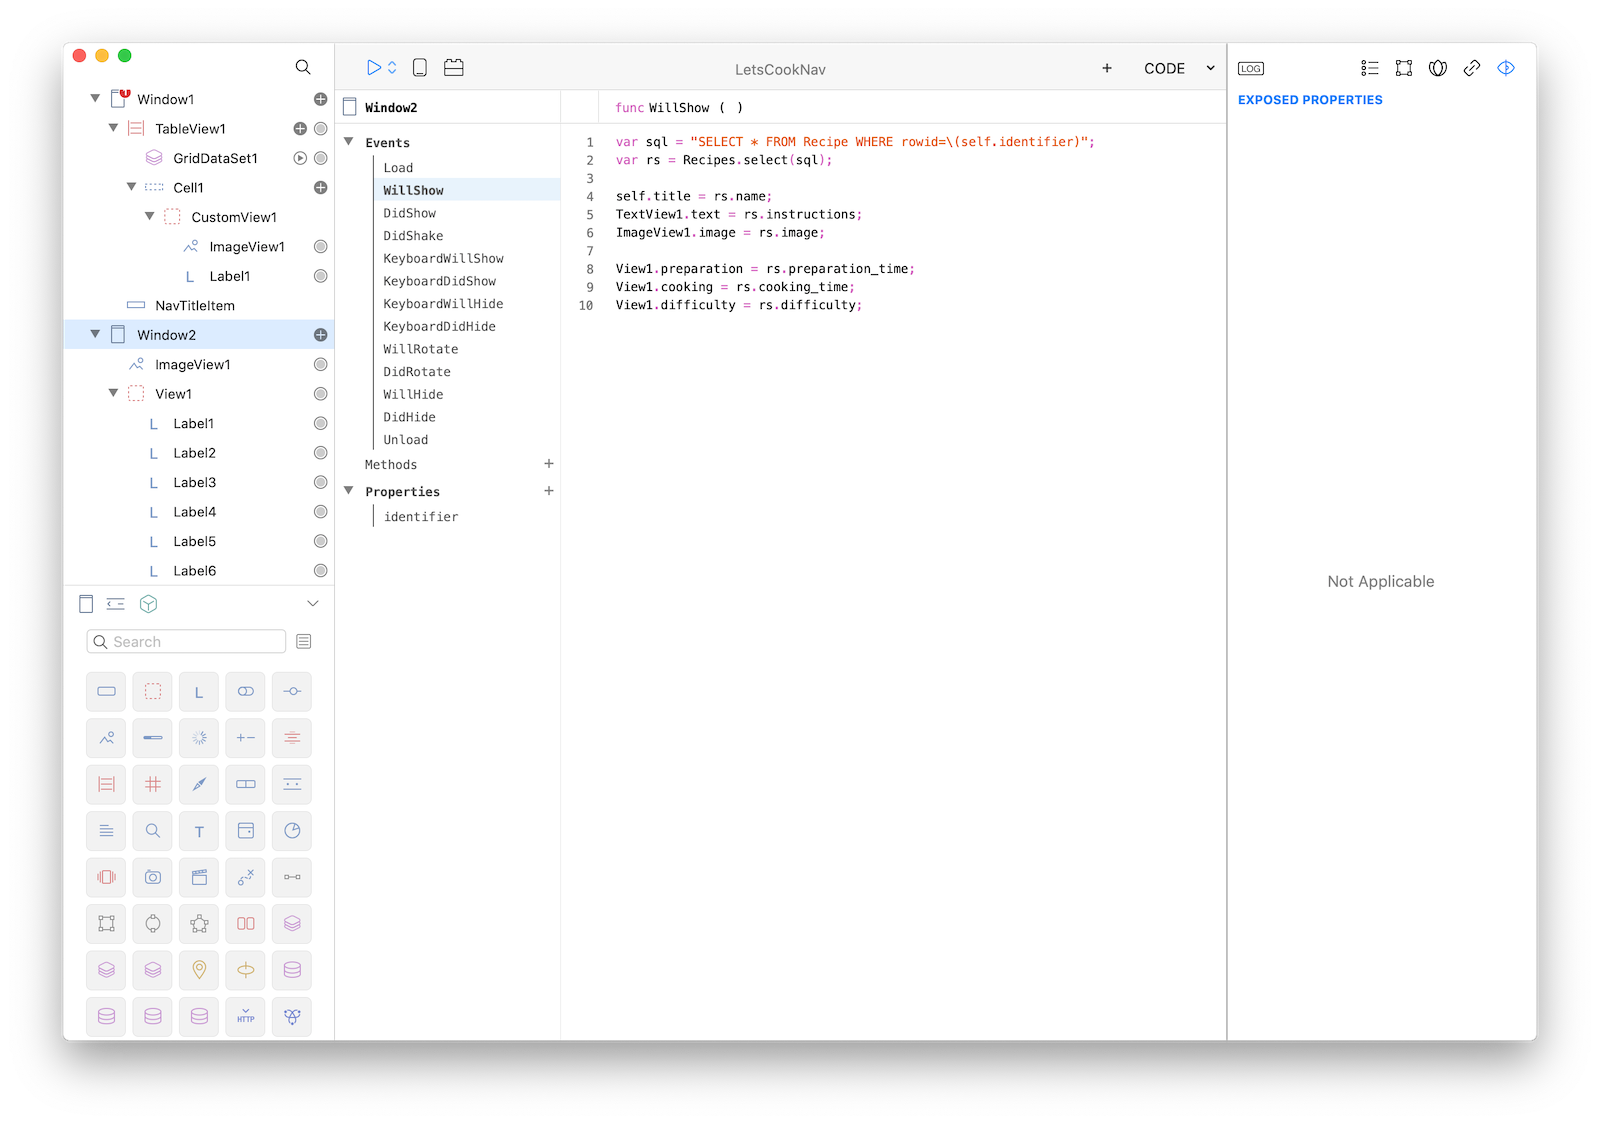
If you run the app in the Creo Simulator you'll now see that labels are correctly set:
27 Lets Cook app could be declared completed but we'd like to show you one more very useful trick, so lets continue with the very latest step. Wouldn't be cool if instead of a numeric value for the difficulty level a graphical star indicator was used? That's exactly what we are going to do.
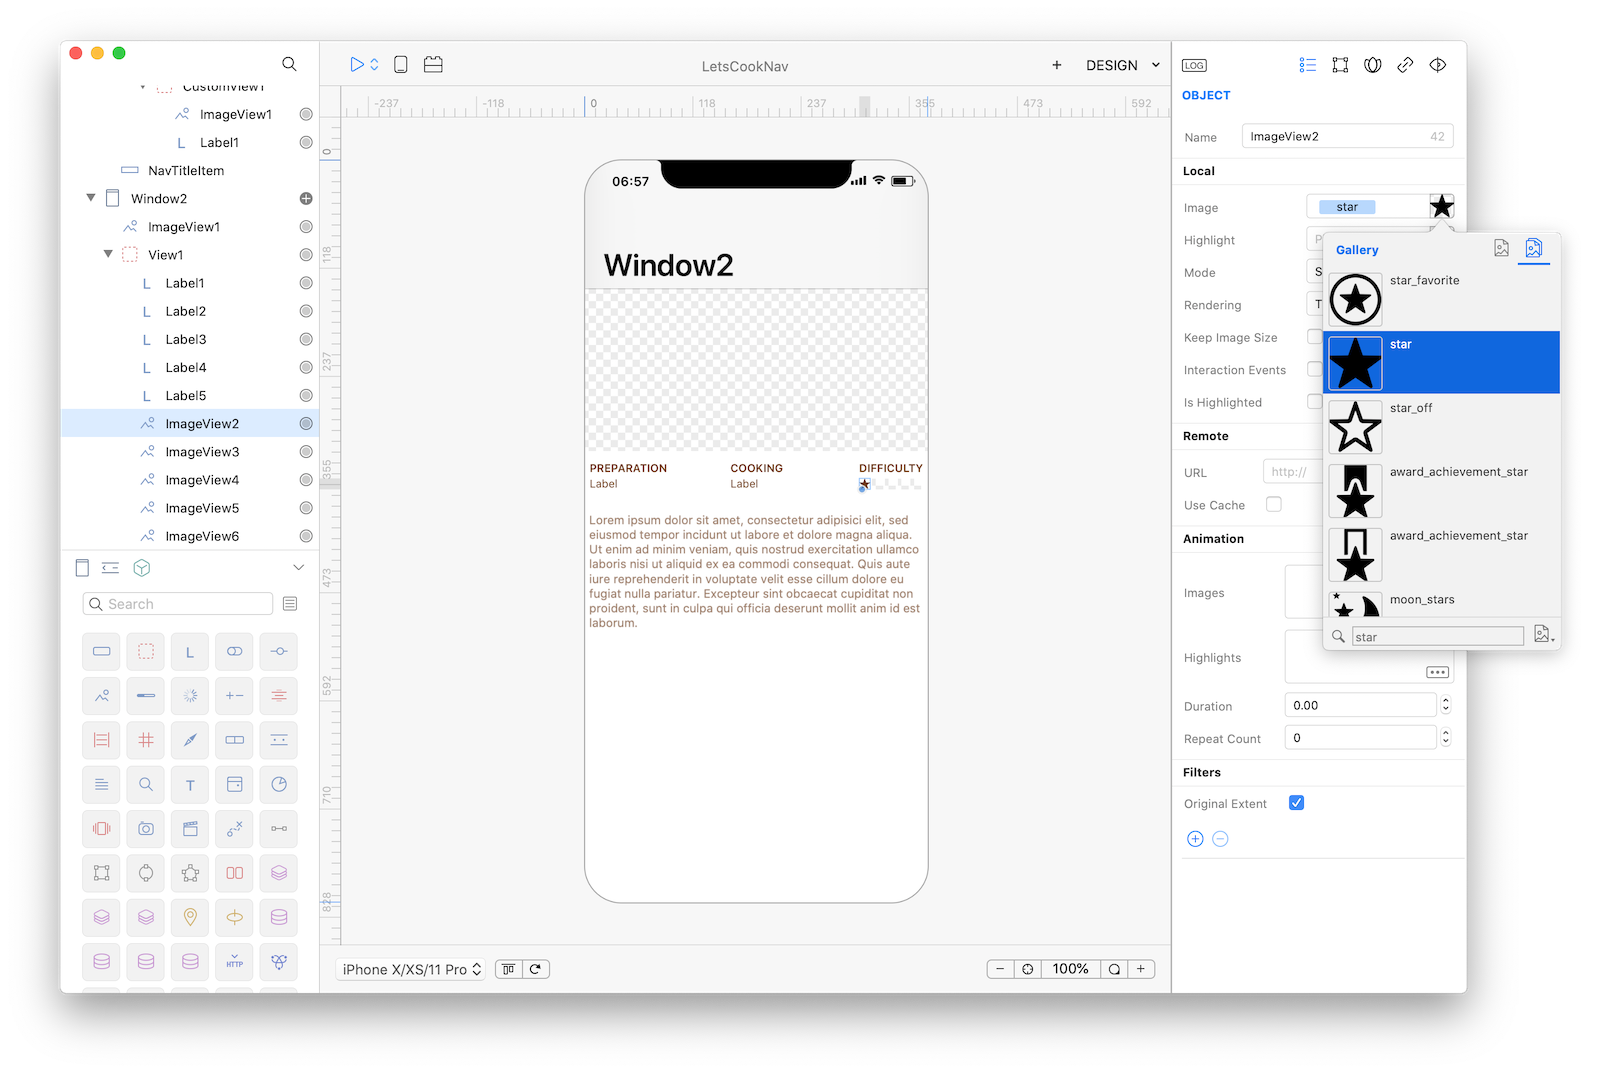
Select Label6 inside View1 and delete it. Drop 5 ImageView to View1 and set the following properties:
| Object | Property | Value |
|---|---|---|
| ImageView2 | Rendering | Tinted |
| ImageView2 | Tint Color | #703B14 |
| ImageView2 | Frame | x:295 y:27 w:12 h:12 |
| ImageView3 | Rendering | Tinted |
| ImageView3 | Tint Color | #703B14 |
| ImageView3 | Frame | x:309 y:27 w:12 h:12 |
| ImageView4 | Rendering | Tinted |
| ImageView4 | Tint Color | #703B14 |
| ImageView4 | Frame | x:323 y:27 w:12 h:12 |
| ImageView5 | Rendering | Tinted |
| ImageView5 | Tint Color | #703B14 |
| ImageView5 | Frame | x:337 y:27 w:12 h:12 |
| ImageView6 | Rendering | Tinted |
| ImageView6 | Tint Color | #703B14 |
| ImageView6 | Frame | x:351 y:27 w:12 h:12 |
In Inspector for ImageView2 image select the star built-in icon and re-select the same image for all the remaining ImageViews.
 You'll end up with something like this:
 We want the ImageViews to be hidden and show up only if the difficult level is greater than a certain value. So select all the ImageViews and check the Hidden property from the Inspector:
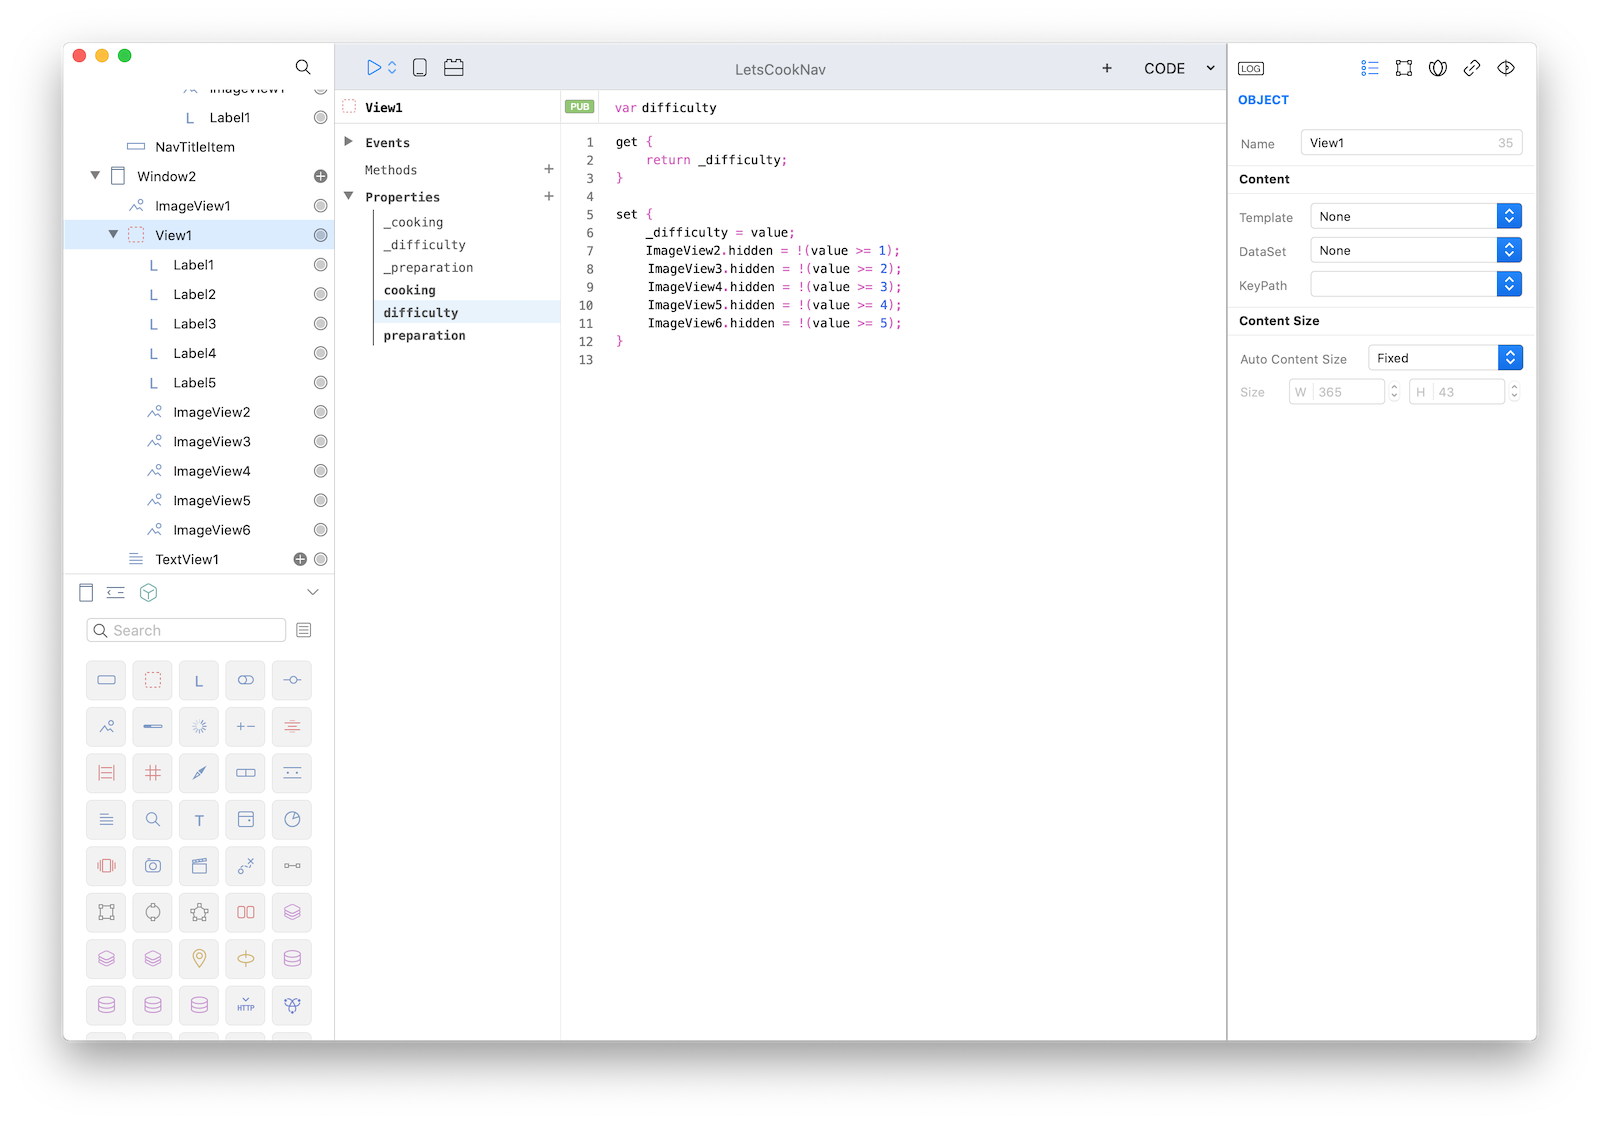
28 The final step is to modify the difficulty setter in order to hide/show the propert ImageView based on the difficulty level. The new code is:
get {
    return _difficulty;
}

set {
    _difficulty = value;
    ImageView2.hidden = !(value >= 1);
    ImageView3.hidden = !(value >= 2);
    ImageView4.hidden = !(value >= 3);
    ImageView5.hidden = !(value >= 4);
    ImageView6.hidden = !(value >= 5);
}
29 Press RUN and enjoy the LetsCookNav app!
You can now send the app to CreoPlayer or build it and then submit to the App Store.
Project
- LetsCookNav.creoproject (2.8MB)