HTTPClient
The HTTPClient class and HTTPRequest class enable you to download content via HTTP. With an HTTPClient object you can configure the common connection parameters that can be used by one or more HTTPRequest, each of which represents a request for a specific URL.
The HTTPClient defines the protocol, the server host, the authentication parameters and the configuration of the connection behavior, such as whether to allow connections over a cellular network, the cookie policy, the cache policy and so on.
An HTTPRequest is always part of an HTTPClient and defines the request specific properties like the HTTP method, the path of the resource with the possibility to use dynamic values for header, path, query and body parameters.

How to use
- Drop a
HTTPClientcontrol from the object panel to aWindowor to the Globals folder. - Use the
HTTPClient Inspectorto customize its properties likeProtocol,Host, andAuthentication. - Click on the subnode button (+) and add a Request
- Use the
HTTPRequest Inspectorto customize its properties likeMethod,Path, andSerializer.
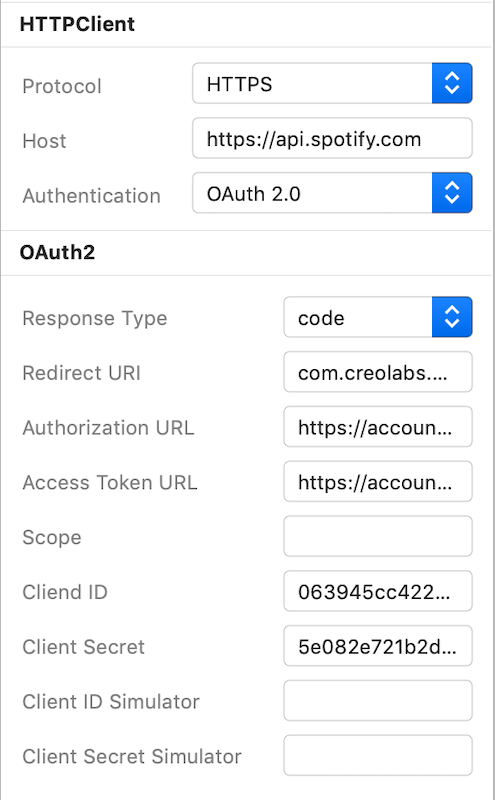 The inspector where the
 HTTPClient class can be configured.
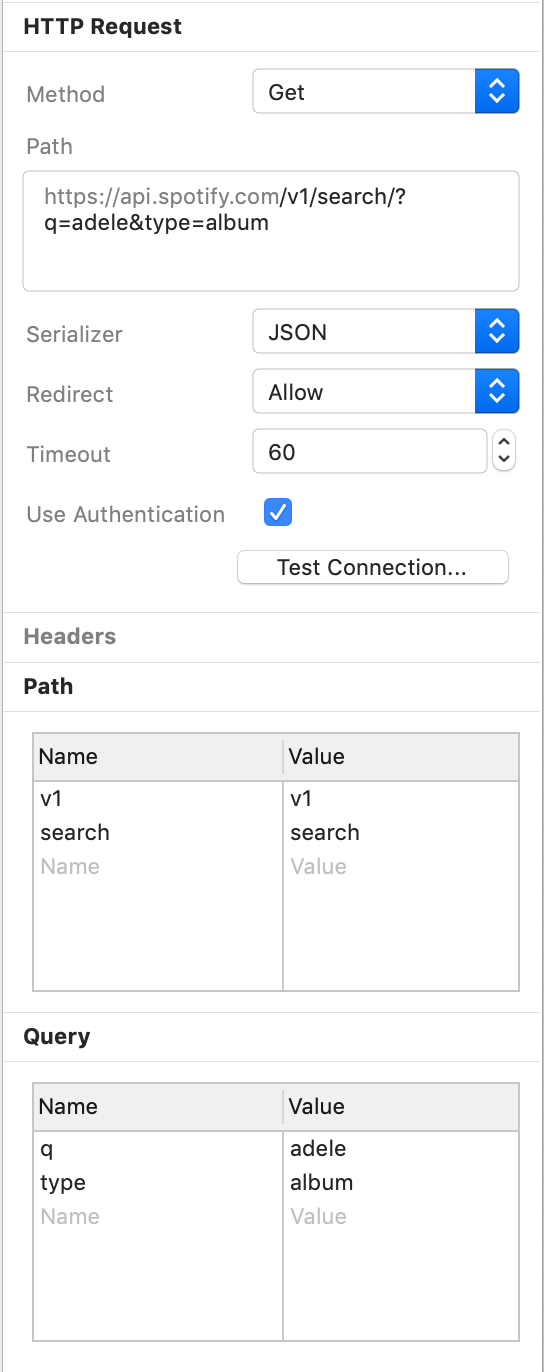 The inspector where the
 HTTPRequest class can be configured.
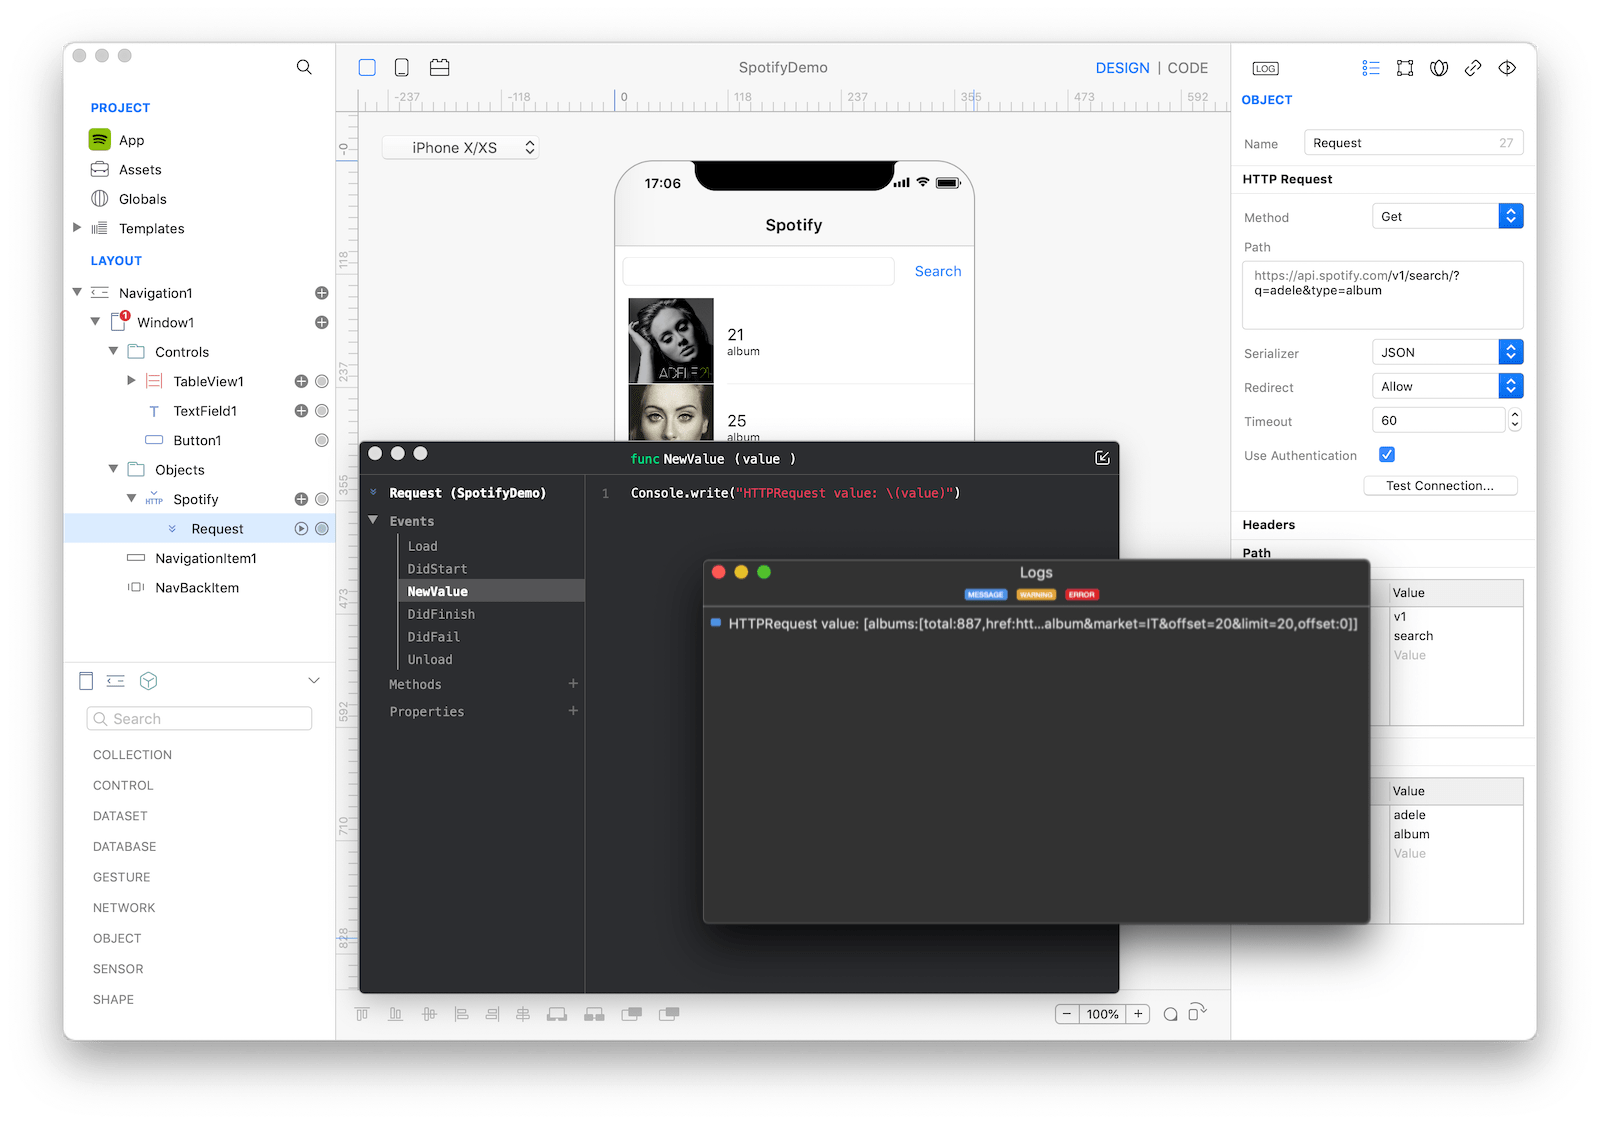 The
The Code Editor where to interact with events and write custom code and the Log Panel with a sample value after running the project in the Simulator.
Example
- Open the
Code Editor(cmd + 6) - Select the
NewValueitem inside theEventsgroup and write your custom code in theCode EditorConsole.write("HTTPRequest value: \(value)") - Select the
DidFailitem inside theEventsgroup and write your custom code in theCode EditorConsole.write("HTTPRequest DidFail with error: \(self.error)") - Run the project in
Simulatorfrom theAction Bar
Most important events
Most important events for an HTTPRequest object:
NewValue: Event raised when a new value becomes available.DidFail: Event raised when an error response is received. Use theself.errorproperty to get the error.
Most important properties
Most important properties for HTTPClient:
Protocol: Choose between HTTP and HTTPS, the selection is reflected in theHostproperty.Host: The hostname of the HTTP server (the path component of the URL will be specified in theHTTPRequestsubnode). Add here the :port value if needed.Authentication: The type of authentication, choose between No Auth, Basic Auth (usernameandpassword), OAuth 1.0 or OAuth 2.0.
The authentication details section depends on the selected authentication type.
The details are programmatically available through the authDetails property, the value of this property is a Map where each key is a specific detail property for the selected authentication type.
- No Auth: no details are needed
- Basic Auth:
- username
- password
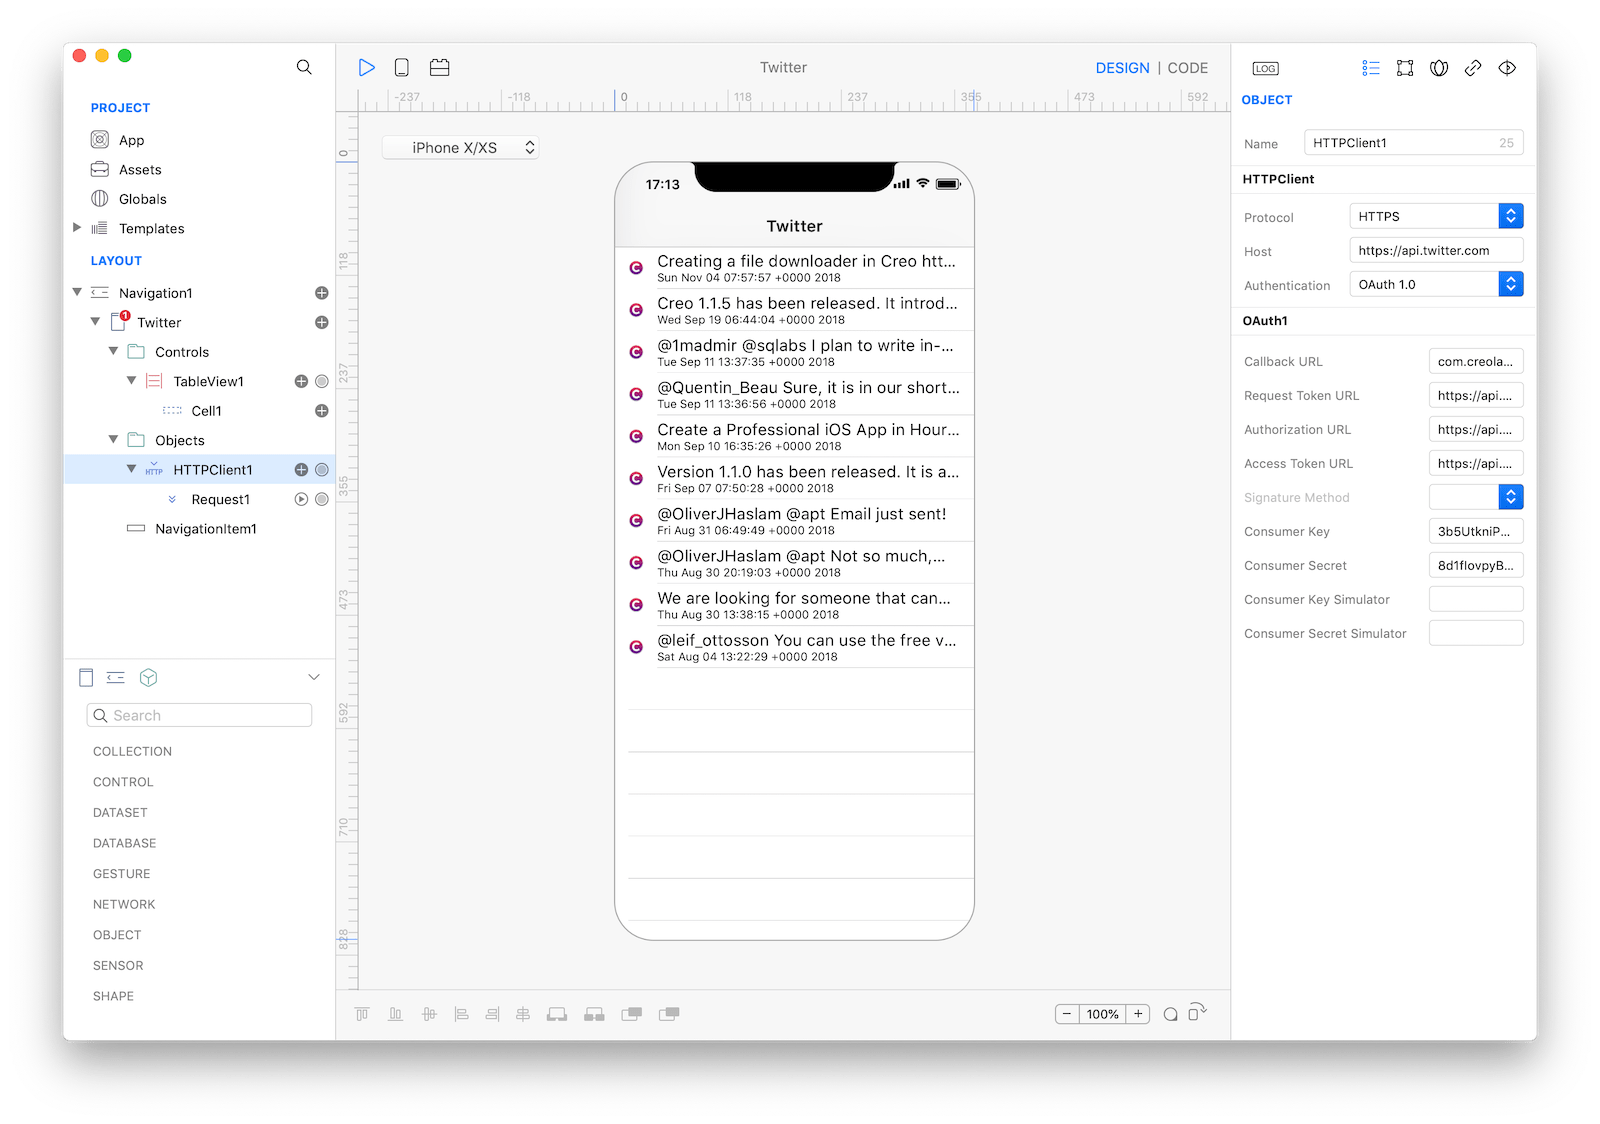
- OAuth 1.0:
- Callback URL: The callback URL is used during the authorization process. After users authorize your application on the site, they'll be redirected back to your callback URL. The schema of this URL must be added as a custom URL in the App's property list (ref: Support URL TechNote). Typically, you have to use a valid callback URL registered for your App's account in the developer page of your API. When the
HTTPClientis run in the Creo Simulator or in the CreoPlayer, Creo uses the built-in callback URL com.creolabs.creo://oauth1Callback in order to be able to receive the callback, so you need to add this value in the API provider page if you want to test your App in these platforms. Your custom Callback URL is used when your App is installed and executed in a real device. Example: "com.your-company-name.your-app-name://oauth1Callback" - Request Token URL: The URL, supplied by the site, used for acquiring temporary credentials in the first step of authorization flow (also known as a Request Token).
- Authorization URL: The authorization URL supplied by the site.
- Access Token URL: The token request endpoint supplied by the site.
- Signature Method: not yet supported
- Consumer Key: The client key supplied by the API provider.
- Consumer Secret: The client secret supplied by the API provider.
- Consumer Key Simulator: If the API provider doesn't allow to authorize two different callback URLs, you can create two different App accounts for the API, one for the built App with your personal callback URL and one for the Creo Simulator/CreoPlayer with the Creo built-in callback URL. Use this property to set the client key related to the Creo built-in callback URL. If this property has an empty value, the Consumer Key is used in the Creo Simulator and in the CreoPlayer.
- Consumer Secret Simulator: If the API provider doesn't allow to authorize two different callback URLs, you can create two different App accounts for the API, one for the built App with your personal callback URL and one for the Creo Simulator/CreoPlayer with the Creo built-in callback URL. Use this property to set the client secret related to the Creo built-in callback URL. If this property has an empty value, the Consumer Secret is used in the Creo Simulator and in the CreoPlayer.
- Callback URL: The callback URL is used during the authorization process. After users authorize your application on the site, they'll be redirected back to your callback URL. The schema of this URL must be added as a custom URL in the App's property list (ref: Support URL TechNote). Typically, you have to use a valid callback URL registered for your App's account in the developer page of your API. When the
- OAuth 2.0:
- Response Type: Informs the Authorization Server of the desired authorization processing flow, including what parameters are returned from the endpoints used.
- Redirect URI: Where the service redirects the user-agent after an authorization code is granted. The schema of this URL must be added as a custom URL in the App's property list (ref: Support URL TechNote). Typically, you have to use a valid redirect URI registered for your App's account in the developer page of your API. When the
HTTPClientis run in the Creo Simulator or in the CreoPlayer, Creo uses the built-in redirect URI com.creolabs.creo://oauth2Callback in order to be able to receive the callback, so you need to add this value in the API provider page if you want to test your App in these platforms. Your custom Redirect URI is used when your App is installed and executed in a real device. Example: "com.your-company-name.your-app-name://oauth2Callback". - Authorization URL: The API authorization endpoint.
- Access Token URL: The API token endpoint.
- Scope: The authorization and token endpoints allow the client to specify the scope of the access request.
- Client ID: Once your application is registered, the service will issue "client credentials" in the form of a client identifier and a client secret. The Client ID is a publicly exposed string that is used by the service API to identify the application.
- Client Secret: The Client Secret is used to authenticate the identity of the application to the service API when the application requests to access a user's account.
- Client ID Simulator: If the API provider doesn't allow to authorize two different redirect URIs, you can create two different App accounts for the API, one for the built App with your personal callback URL and one for the Creo Simulator/CreoPlayer with the Creo built-in Redirect URI. Use this property to set the client ID related to the Creo built-in redirect URI. If this property has an empty value, the Client ID is used in the Creo Simulator and in the CreoPlayer.
- Client Secret Simulator: If the API provider doesn't allow to authorize two different redirect URIs, you can create two different App accounts for the API, one for the built App with your personal callback URL and one for the Creo Simulator/CreoPlayer with the Creo built-in Redirect URI. Use this property to set the client secret related to the Creo built-in redirect URI. If this property has an empty value, the Client Secret is used in the Creo Simulator and in the CreoPlayer.
 The inspector where the details for the OAuth 1.0 authentication of the
 HTTPClient class can be configured.
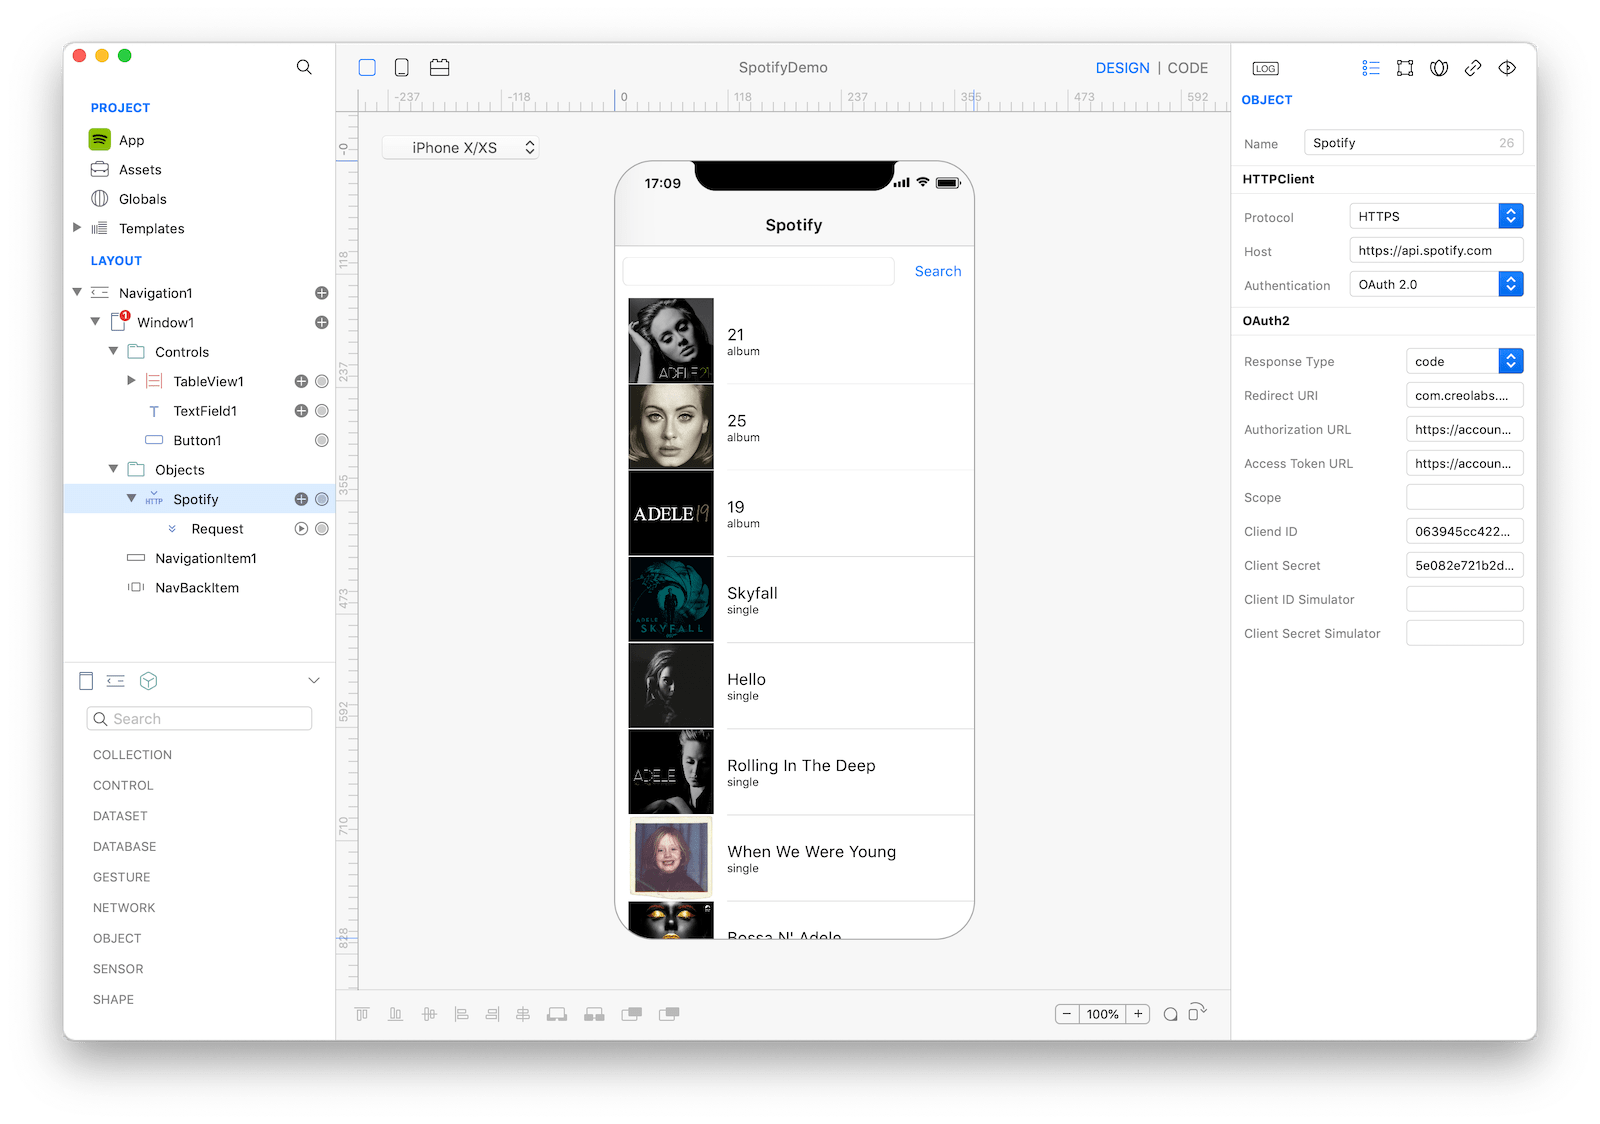 The inspector where the details for the OAuth 2.0 authentication of the
 HTTPClient class can be configured.
Most important properties for HTTPRequest:
Method: Choose between Get, Post, Head, Put, Patch or Delete.Path: The path component of the URL (the host part of the URL is defined by the HTTPClient parent node).Serializer: The response serializer used to validate and decode the server response and set theself.valueproperty. Choose between the following values:- JSON: The
self.valueproperty with the JSON object (a combination of Map, List, String, Numeric, Bool and null objects) corresponding to the JSON representation from the response. - Data: set the
self.valueproperty with the Data representation of the response. - Image: set the
self.valueproperty with String representation of the response. - XML:
- Plist: set the
self.valueproperty with the property list object corresponding to the Plist representation from the response. - Text: set the
self.valueproperty with String representation of the response.
- JSON: The
Header Parameters: each key/value pair is set as a field of the HTTP header of the request.Path Parameters: each segment of the path, separated by a slash, is automatically added to this Map. When the request is performed, theHTTPRequestreplaces each path segment from thePathproperty with the value associated with path segment key. This feature let you change dynamically one or more path segments. For example, if your API have the URL 'https://www.your-api.com/USER_ID/request?' and the 'USER_ID' segment depends on an input value from your user, you can set the 'USER_ID/request' string in thePathproperty and the 'USER_ID' : '123' pair in thePath Parametersproperty; in this example the 'USER_ID' path segment will be replaced with the '123' value or with another custom value if dynamically changed during the execution of the App (ref: Dynamic properties section).Query Parameters: key/value pairs used to compose the query component of the URL. This property is automatically syncronized with the content of thePathproperty.Body Parameters(only available for Post, Put and Patch methods): each key/value pair is added to the body of the request. The IDE inspector of this property let you just configure String values, if you need to set object values (bool, numbers, maps, lists, null) you can do it programmatically by overriding thebodyParametersproperty or the dynamic properties.
Dynamic properties
The values of the following Map parameters can also be accessed programmatically as a dynamic property of the HTTPRequest instance.
| Class | Property |
|---|---|
| HTTPClient | Auth Details |
| HTTPRequest | Header Parameters |
| HTTPRequest | Path Parameters |
| HTTPRequest | Query Parameters |
| HTTPRequest | Body Parameters |
The dynamic properties are automatically exposed using the Map key as the property name if the key is a valid property name in Gravity (starts with a letter and contains only alphanumeric characters).
For example, if you have an HTTPClient named HTTPClient1 with an HTTPRequest named Request1 as a subnode and the Request1 as the ['userid' : 'xxx'] value for the Path Parameters property, you can programmatically set a new value for the 'userid' with the following code:
// Update the value of the 'userid' dynamic property.
// For example, if the Path property has value '/userid/request'
// and 'userid' is a key in the Path Paramentes property,
// then the next time the Request1 is executed its composed URL will be:
// '<protocol>://<host>/123/request' (where the <protocol> and <host> are defined
// by the HTTPClient1 parent object)
HTTPClient1.Request1.userid = "123"

// Force the execution of the HTTPRequest
if (HTTPClient1.Request1.running) HTTPClient1.Request1.stop()
HTTPClient1.Request1.run()
References
-
HTTPClient class reference contains a complete list of properties and methods that can be used to customize a
HTTPClientobject. -
HTTPRequest class reference contains a complete list of properties and methods that can be used to customize a
HTTPRequestobject. -
Spotify tutorial contains an example of how to use a Web API with OAuth 2.0 user authentication.